Drivers
On this page, we will cover everything related to the driver role.
- 1. How to Log in/Clock in
- 3. How to Start Trips
- 3. How to Start Trips (+Scanning)
- 4. How to Sell Products
- 4. How to Sell Products (+Scanning)
- 5. Sales with shop replenishment trips
- 5. Sales with shop replenishment trips (+Scanning)
- 6. How to Finish Trips
- 6. How to Finish Trips (+Scanning)
- 7. How to Log out/Clock out
1. How to Log in/Clock in
Log in
In order to use the app, you need to log in using a valid phone number. After that, you will receive a confirmation code and the application will ask you to introduce that code to guarantee a secure authentication.
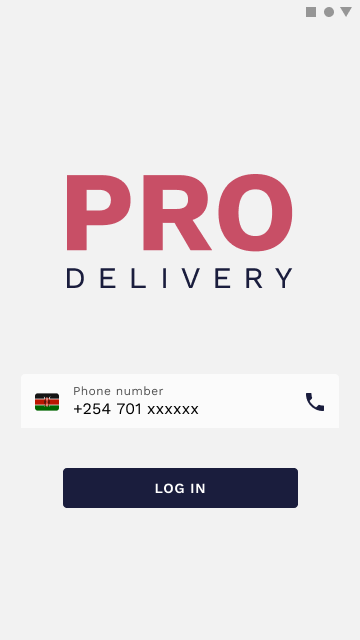
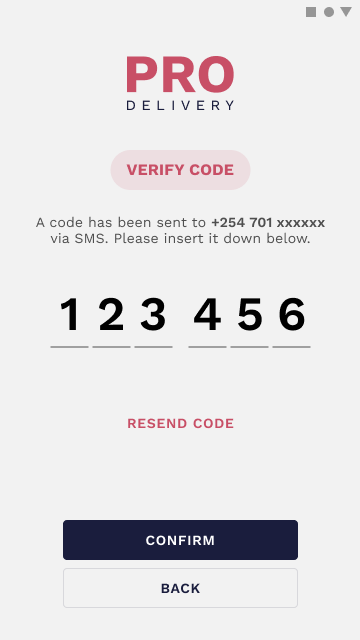
Confirm the code and you’re ready to use the app. In case something goes wrong, you can always ask for another code by clicking on the Resend Code button.
Video tutorial
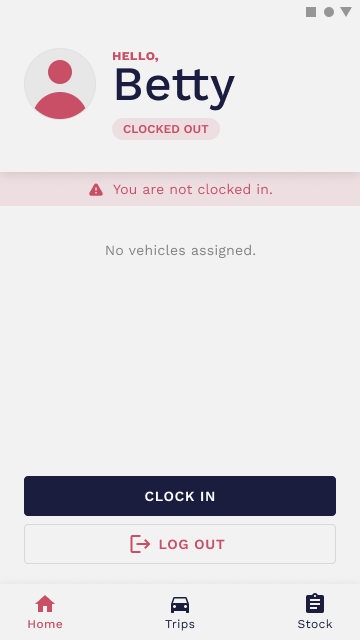
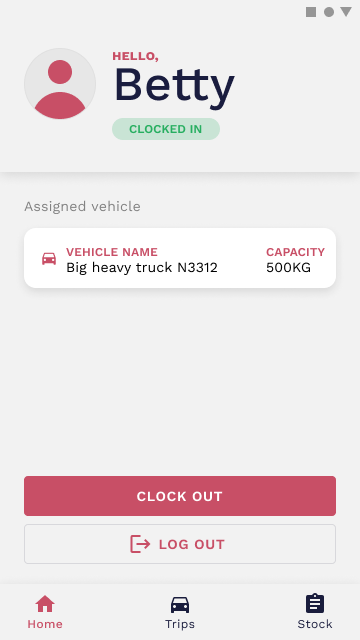
Clock in
To perform any action in the app, besides the Login/Log Out, you need to Clock In to start your shift. You can simply do that by clicking on the Clock In button. Once you’re clocked in, you can view your assignments (trips and vehicles) and start your working shift.
Video tutorial
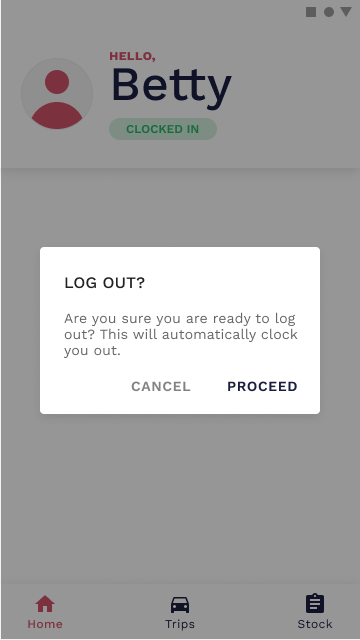
Clock out & Log out
Similar to Clock in, after finishing your shift, you should click on the Clock Out button and Log out. If you Log out without clocking out, it will automatically register your shift as finished.
Video tutorial
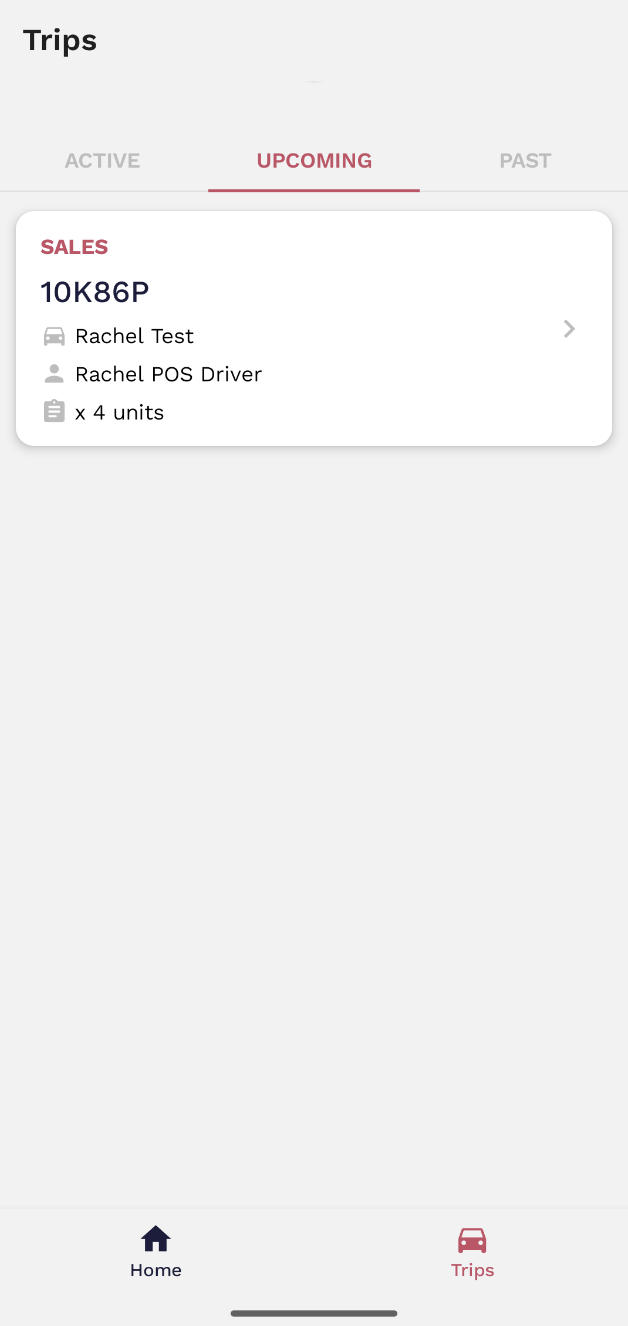
3. How to Start Trips
Start a trip
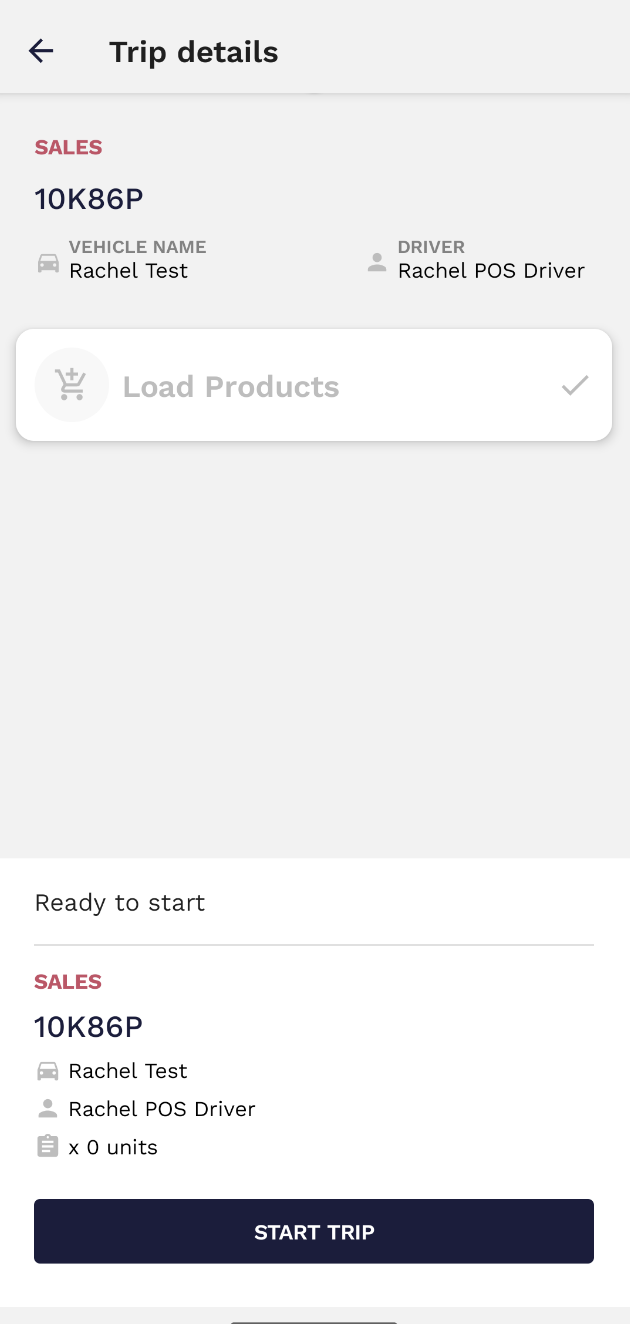
Every driver can perform one trip at a time. To see your scheduled trips, access the Trips tab and check the Upcoming trips.
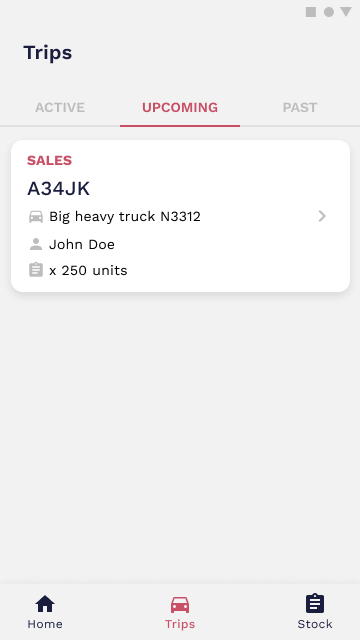
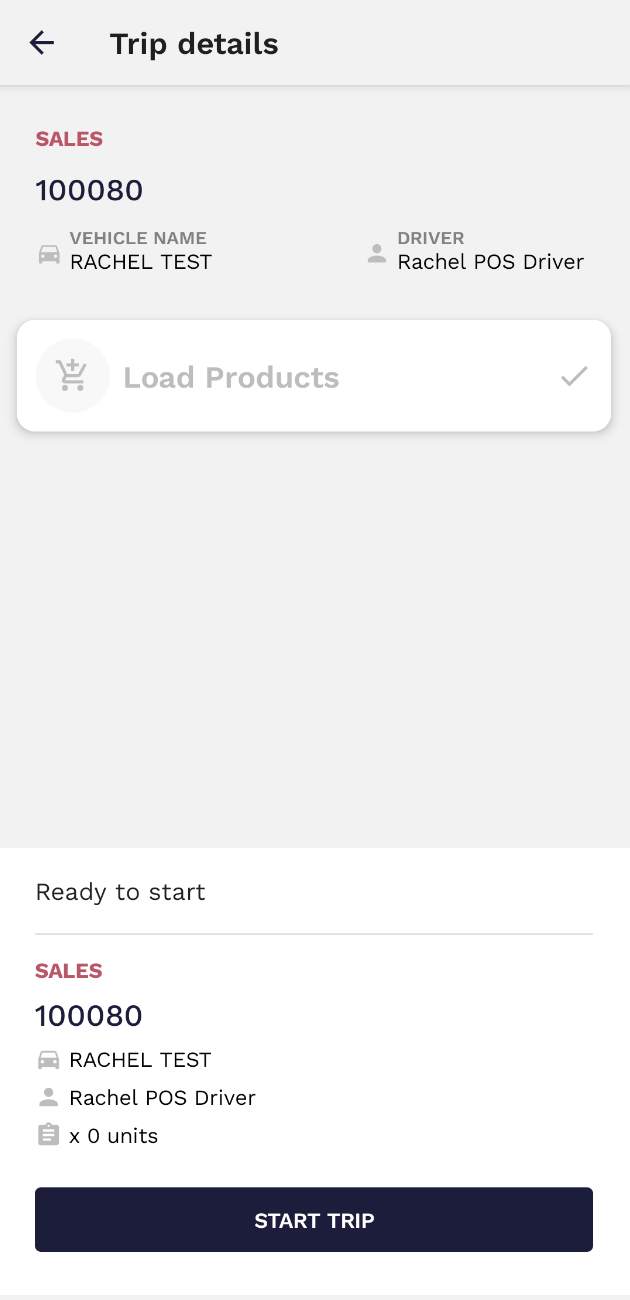
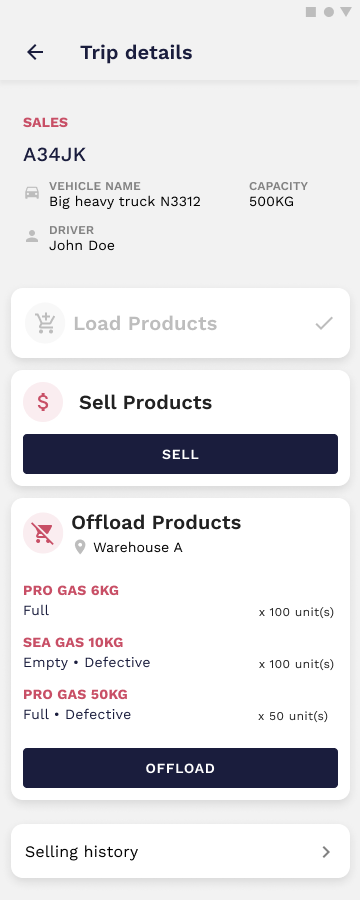
To start a trip all you need to do is select a trip card. It will show you the details page where you can load the products. Each card displays the trip type, ID, vehicle, your name, and the product quantity or warehouses.
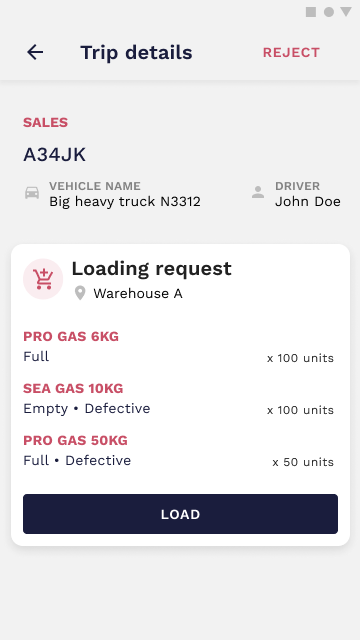
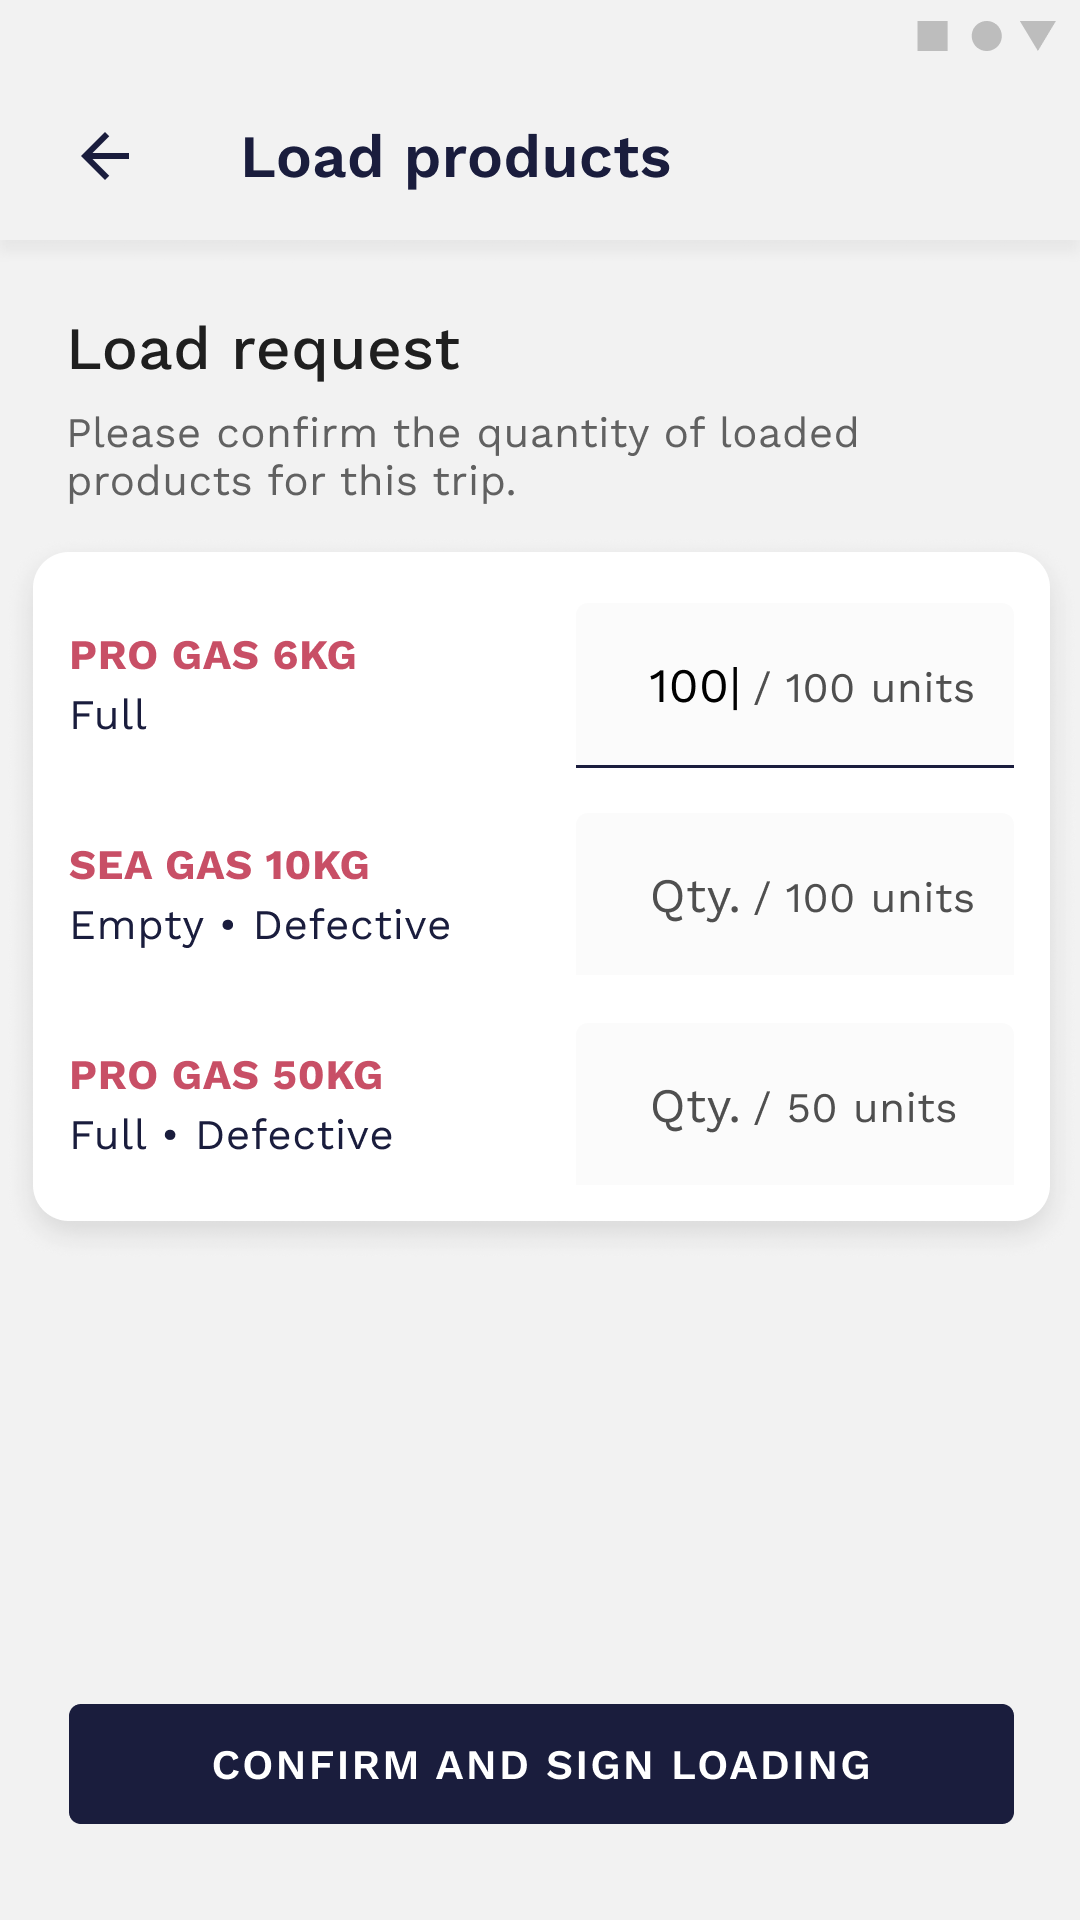
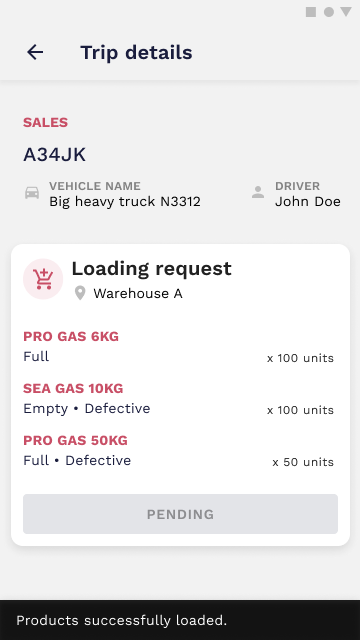
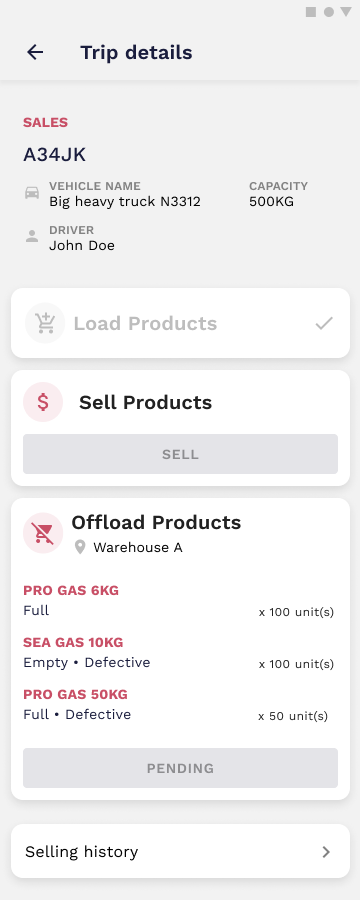
The Load state changes to Pending and the action is completed when both driver and container manager sign the action. You are able to start your trip when a pop-up notification shows up.
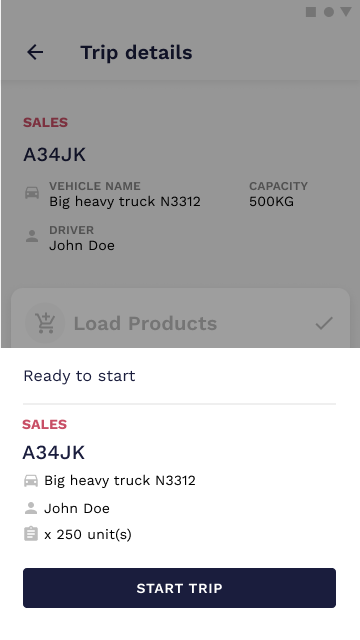

Click on Start Trip to initiate the trip and start to sell the products. The offload option is always available because it is not mandatory to sell every product from the stock in order to offload.
Video tutorial
3. How to Start Trips (+Scanning)
Start a trip
Every driver can perform one trip at a time. To see your scheduled trips, access the Trips tab and check the Upcoming trips.
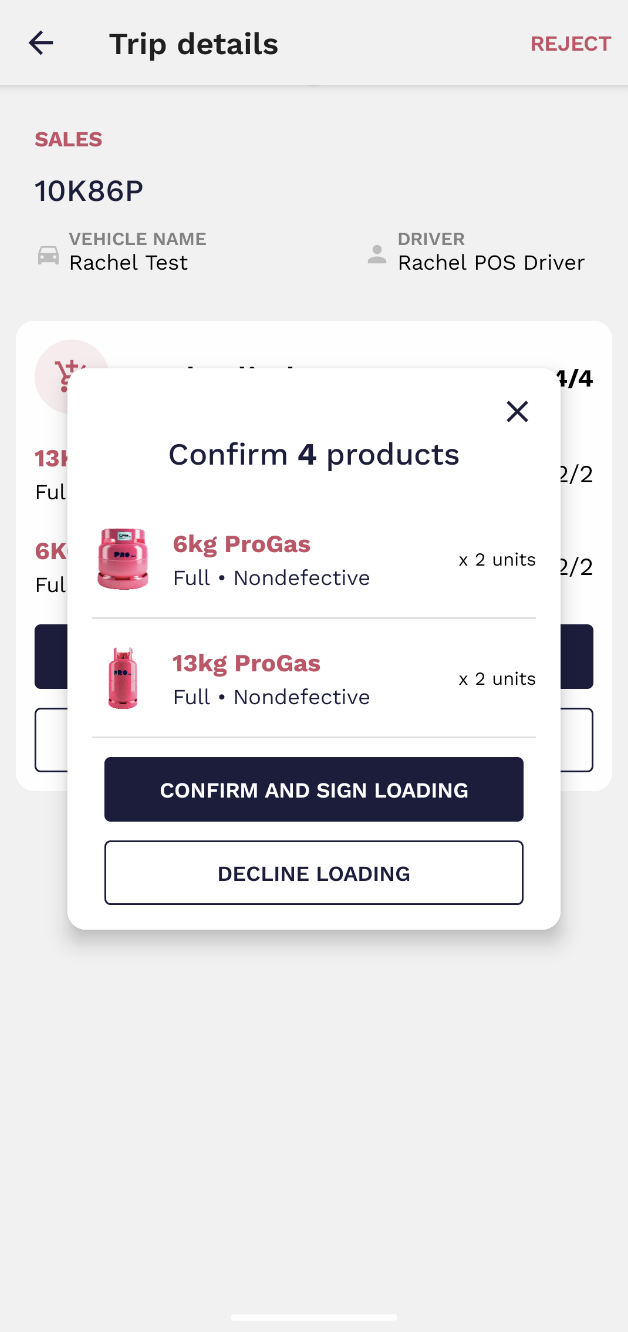
To start a trip all you need to do is select a trip card. It will show you the details page where you can load the products. Each card displays the trip type, ID, vehicle, your name, and the product quantity. Before signing, the container coordinator must scan these cylinders. The fraction (4/4) represents the number of cylinders scanned. When the fraction is complete, it signifies that all cylinders have been scanned, and the trip can be loaded, confirmed, and signed.
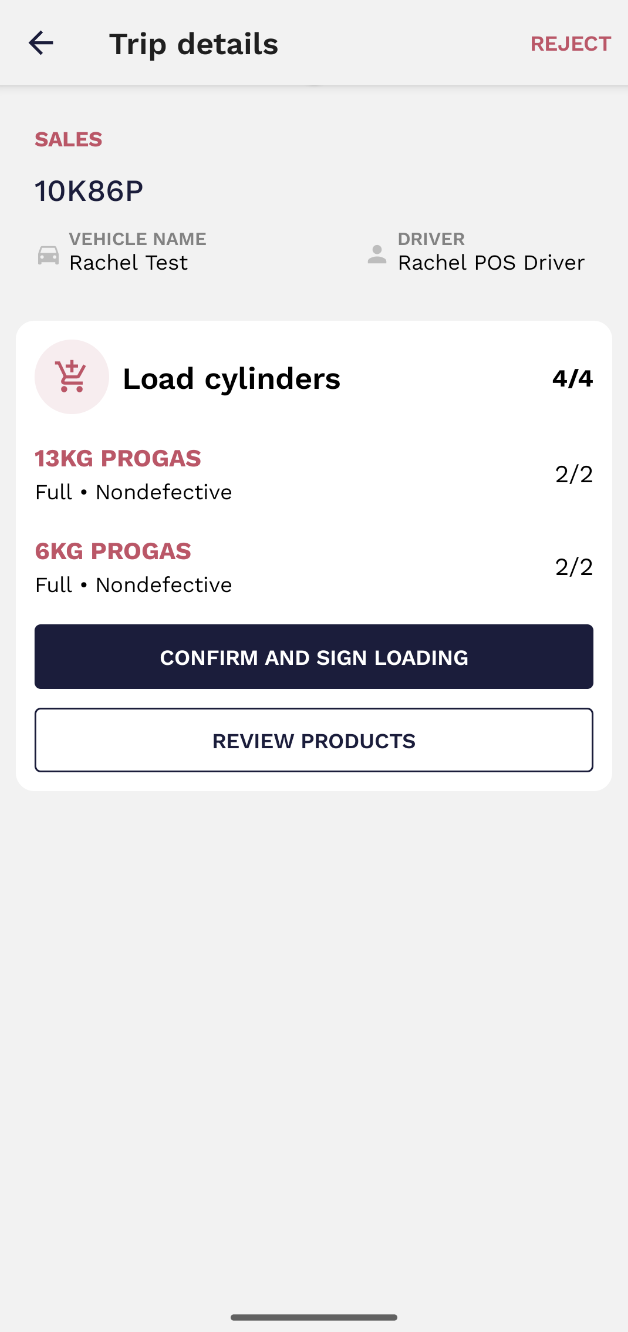
When you click 'confirm and sign loading' a window will appear where you are requested to confirm and sign the loading again.
The offload option is always available because it is not mandatory to sell every product from the stock in order to offload.
Video tutorial
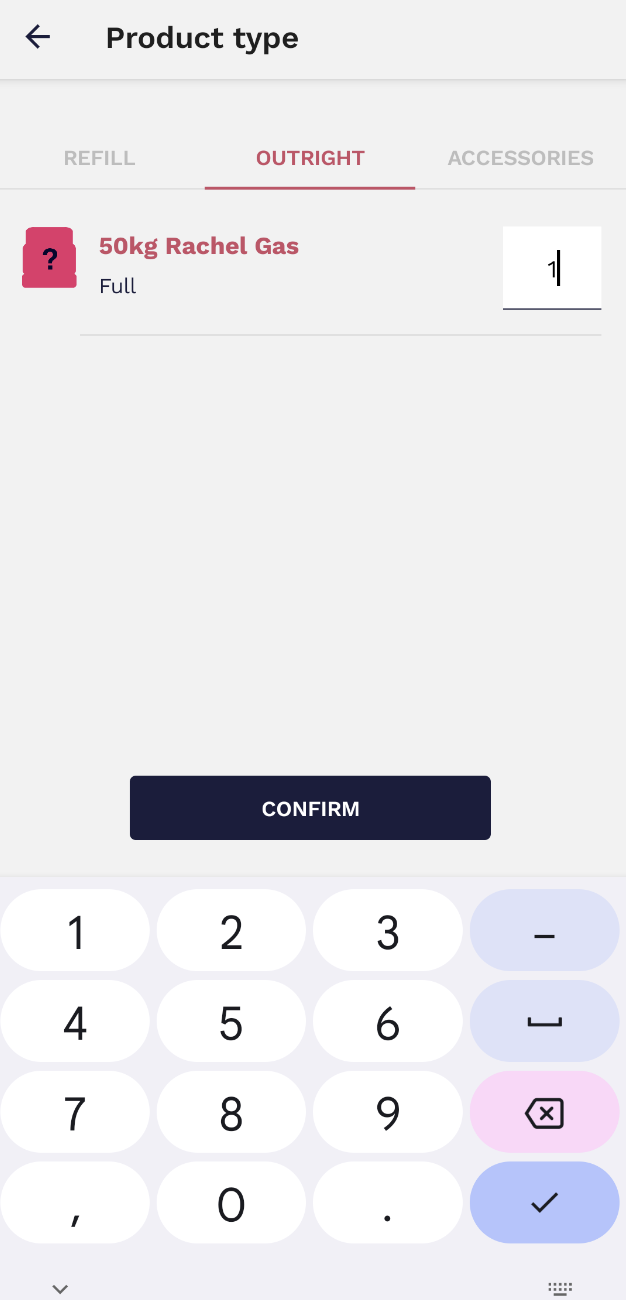
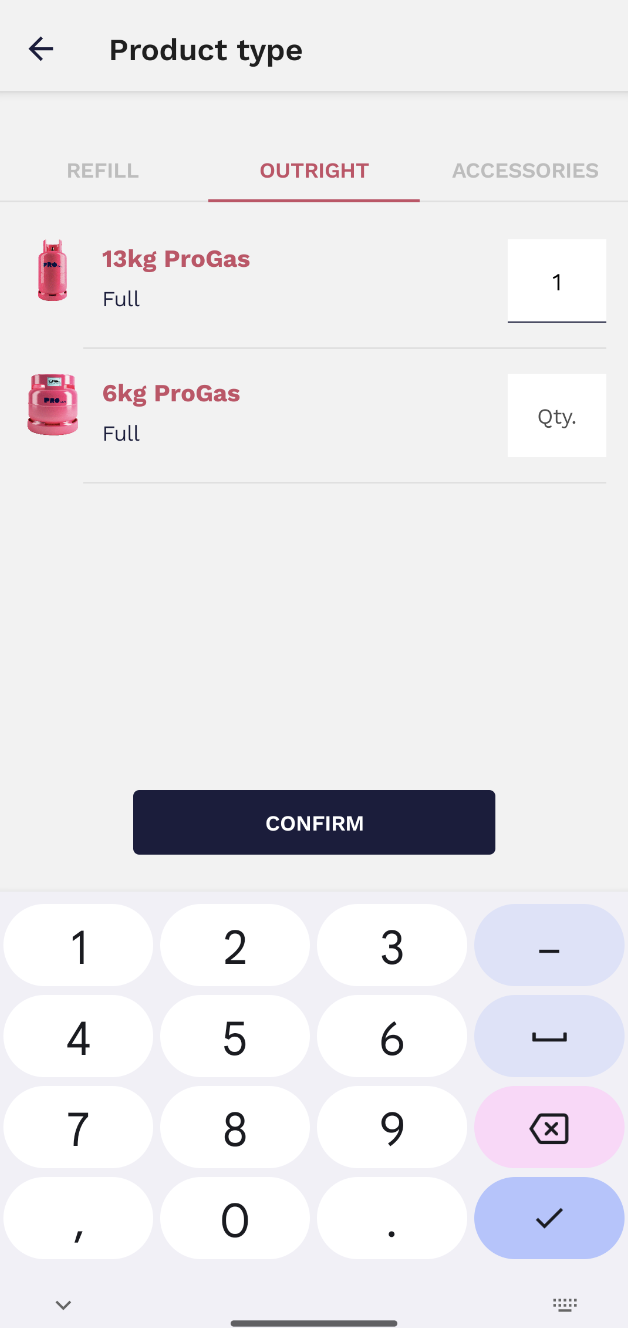
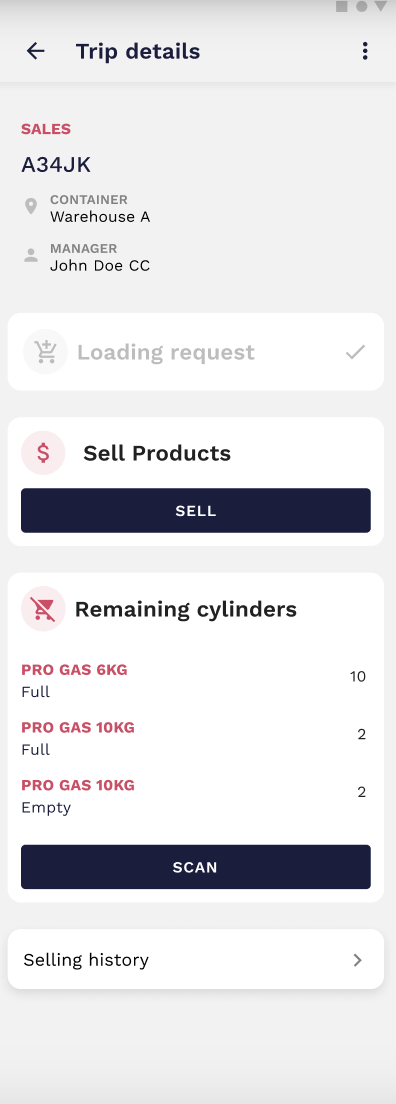
4. How to Sell Products
Sell Products
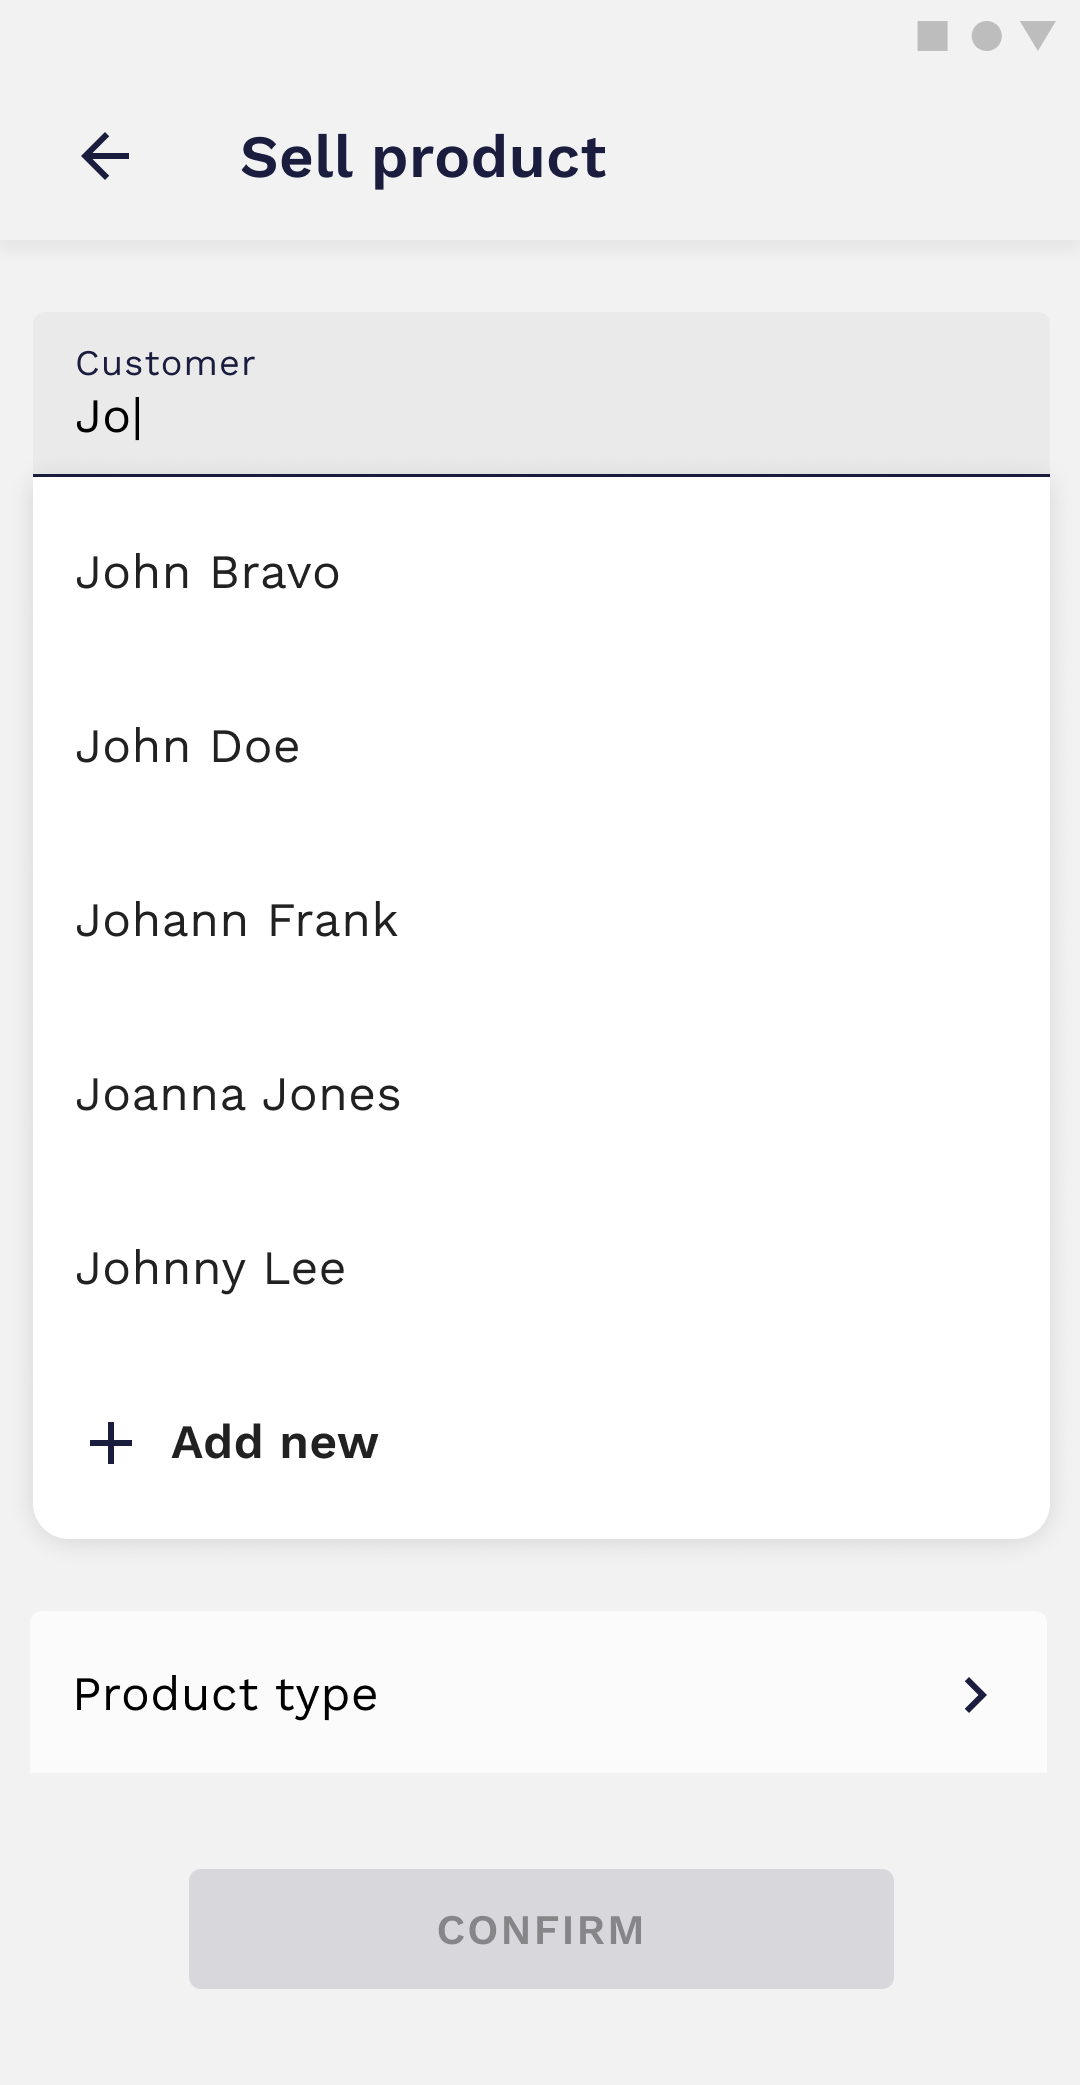
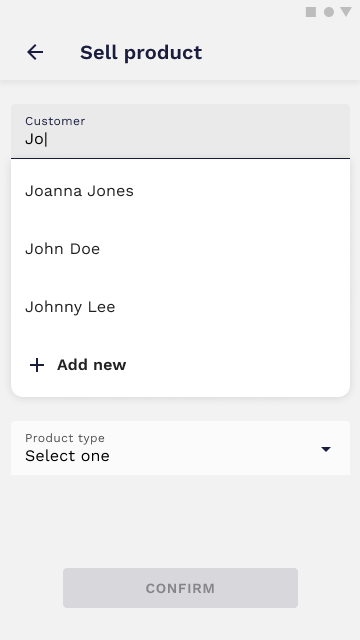
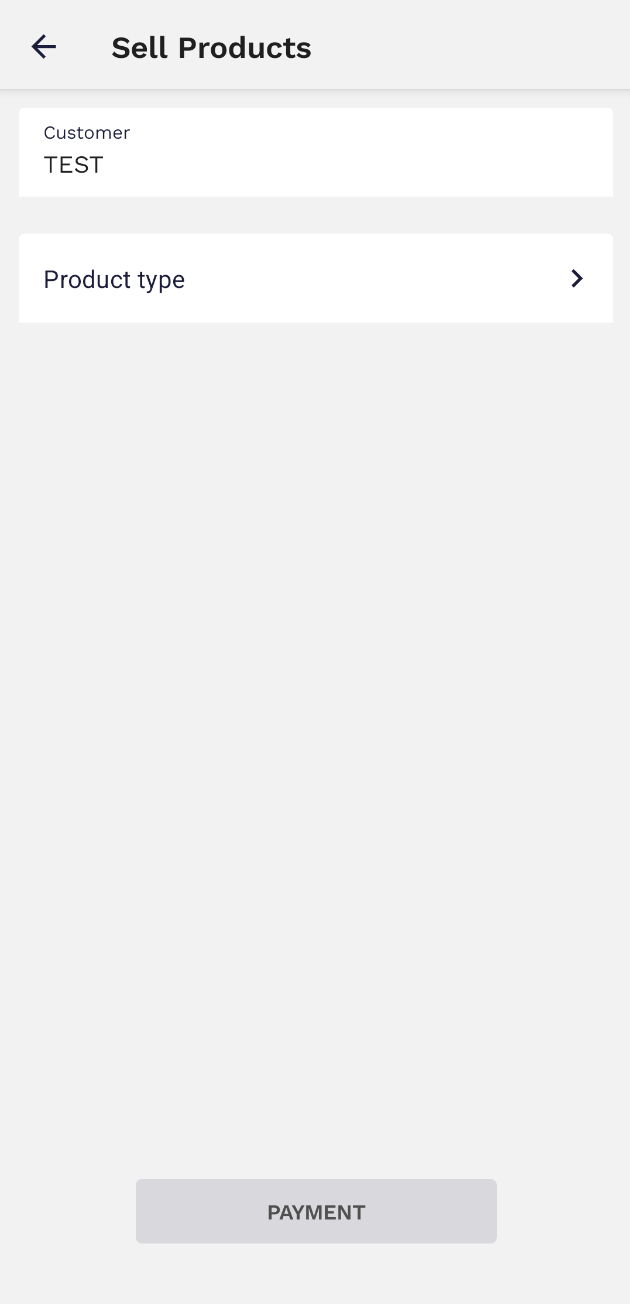
To sell the loaded products, click on the Sell button. This action becomes available only after the Loading action. You can select one of the available customers from the list or create a new one.
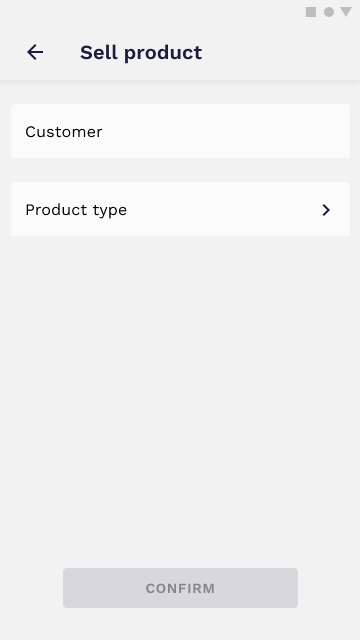
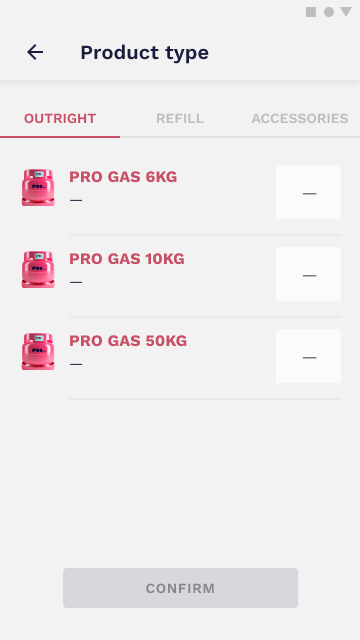
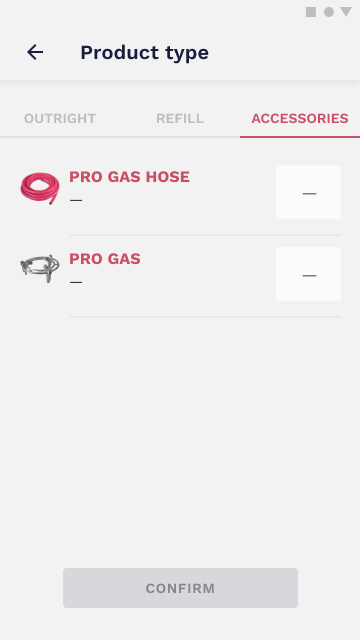
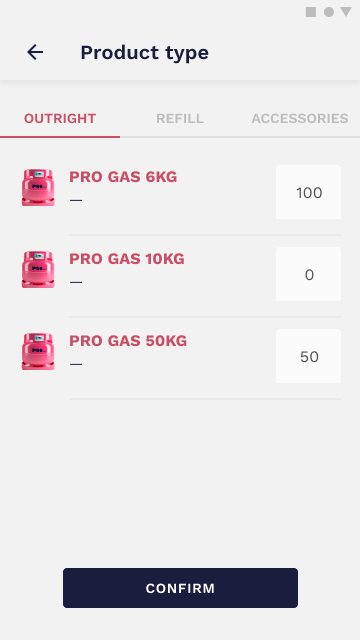
For products, you have access to the product catalog with multiple products (both Outright and Refill) and accessories. All inputs should be filled even if the amount is 0.
 |
 |
 |
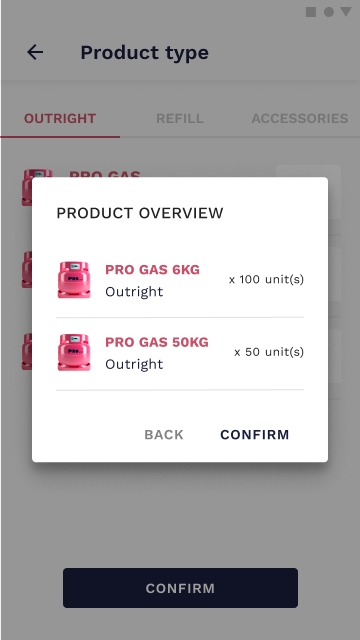
Like any other important action, this one must be confirmed before proceeding. You will be asked to confirm the quantities before moving to the next step.
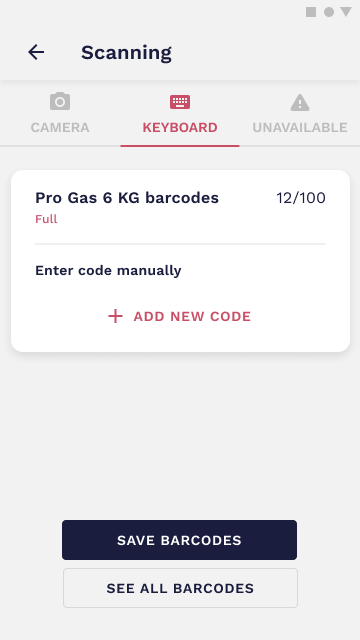
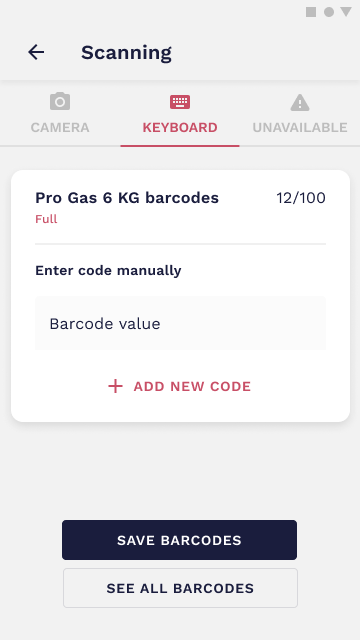
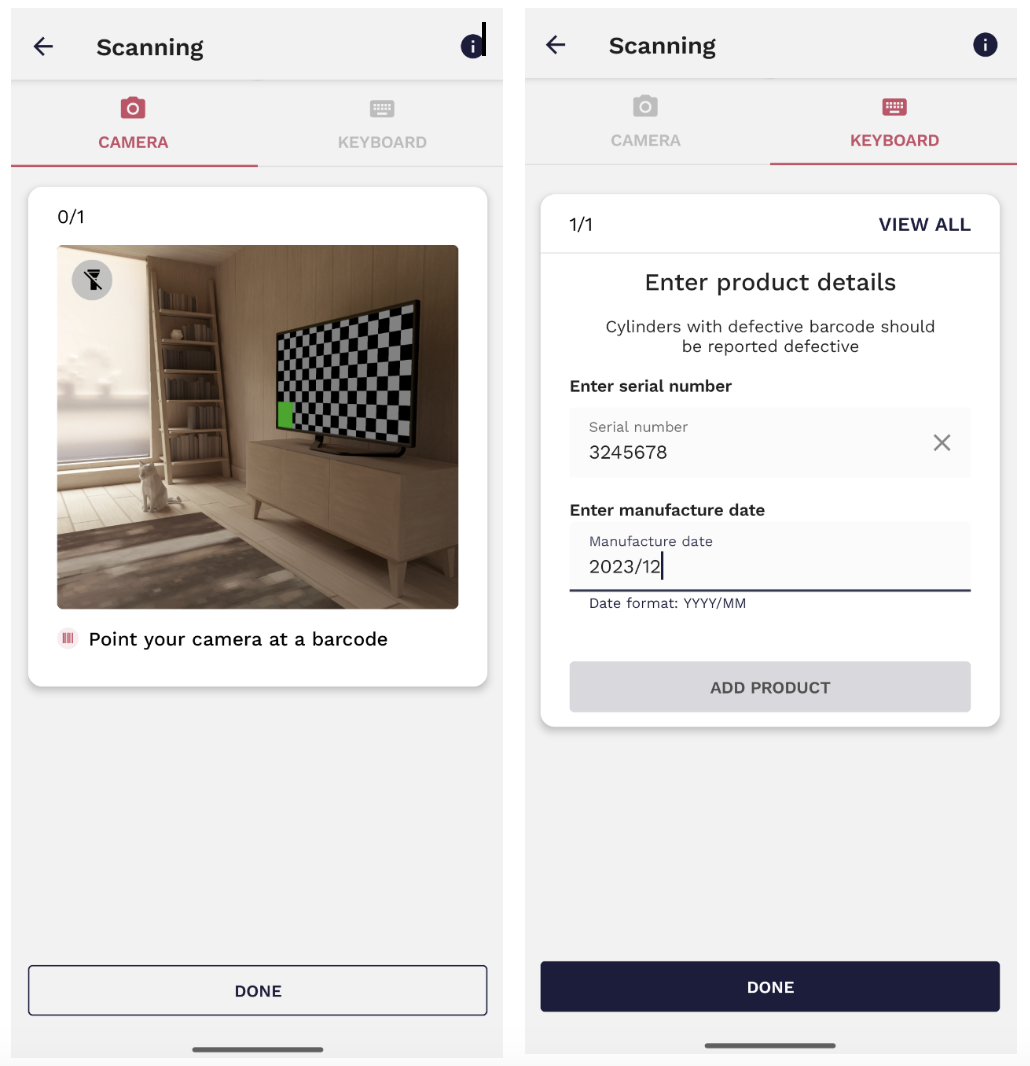
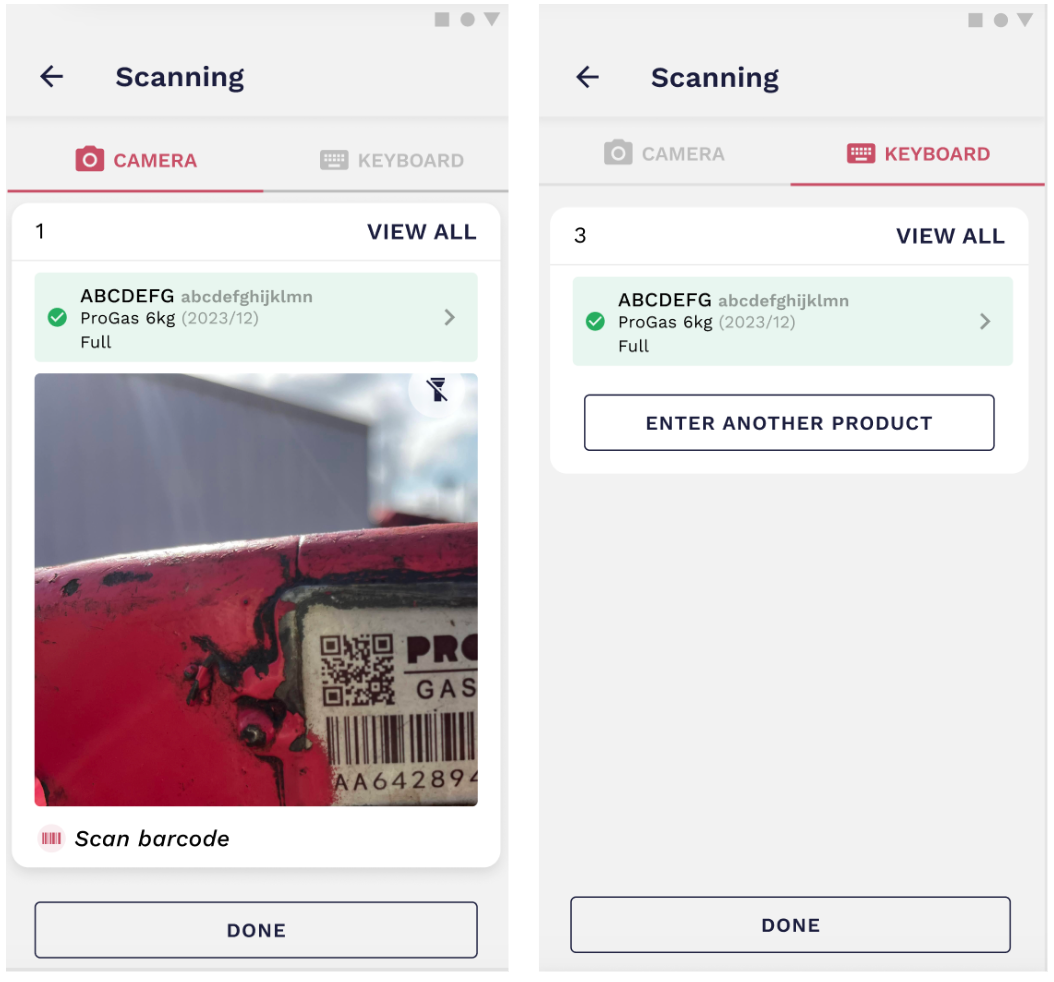
Scanning might be done by three different methods: Camera, Keyboard, or Unavailable. Use the camera to scan the code.
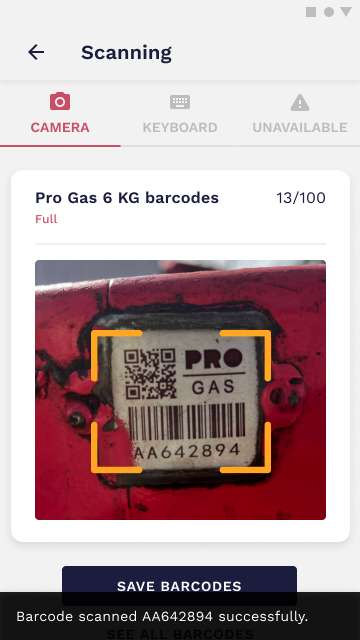
If that doesn't work you can click on KEYBOARD, click on ADD NEW CODE and type in the code. If no code is available click on the UNAVAILABLE tab.
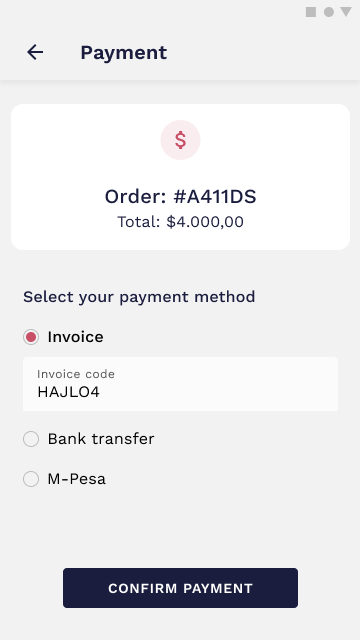
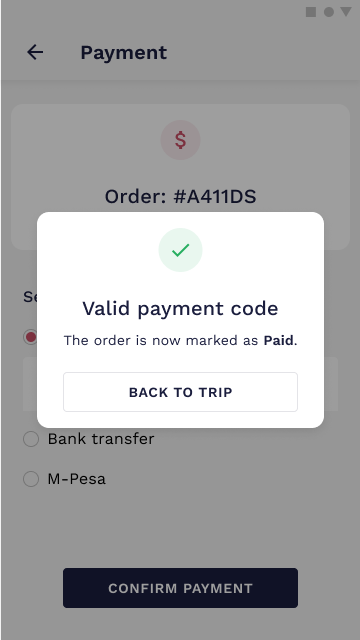
The payment might be done by three different methods: Invoice, Bank transfer, or MPESA code. All of them need a confirmation code to prove that the payment was made. All you need to do is select the payment method, introduce the payment code and confirm it. The request should be processed in a short period of time and if everything is correct, the payment will be successfully processed.
Video tutorial
Create a customer
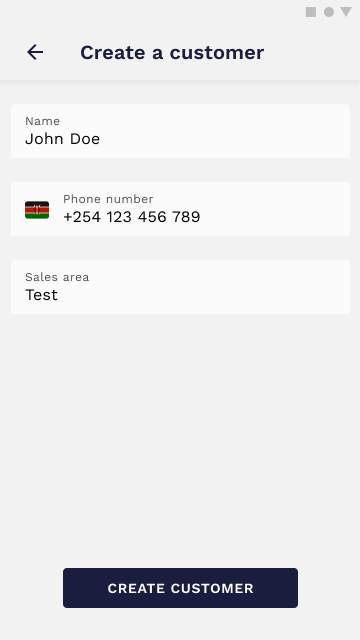
If your customers are not yet added to the customer list, you can manually add them. To do that, all you have to do is select Add new from the customer list and insert their information. They will be automatically added once you submit the form.
Video tutorials
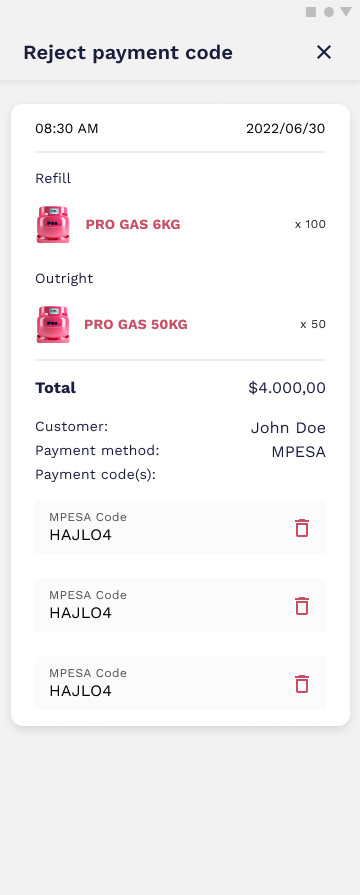
Order details
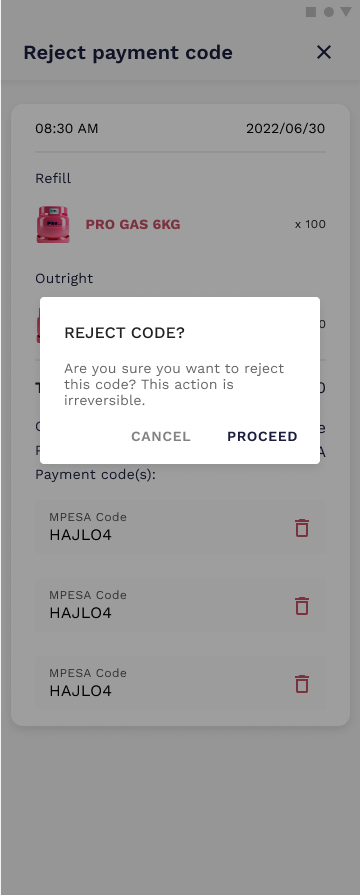
You can always access order details and view the receipts for the products you sold. Besides that, it is possible to add more payment codes, in case it’s needed, or reject the payment if there’s any reason for that.
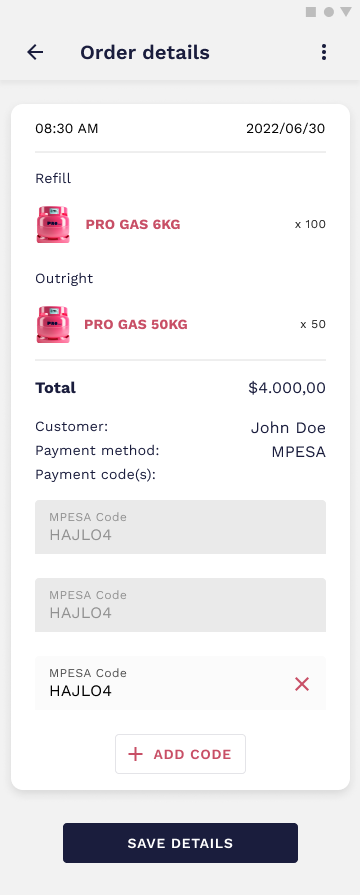
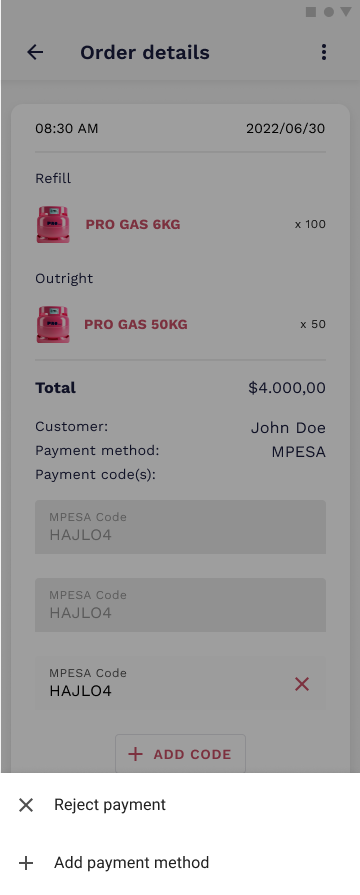
You can reject payment codes but remember that this action is irreversible so it should only be done in case there’s a valid reason for that.
Once the products have been loaded and the load is confirmed and signed, you can begin. Click on Start Trip to initiate the trip and start to sell the products.
The offload option is always available because it is not mandatory to sell every product from the stock in order to offload.
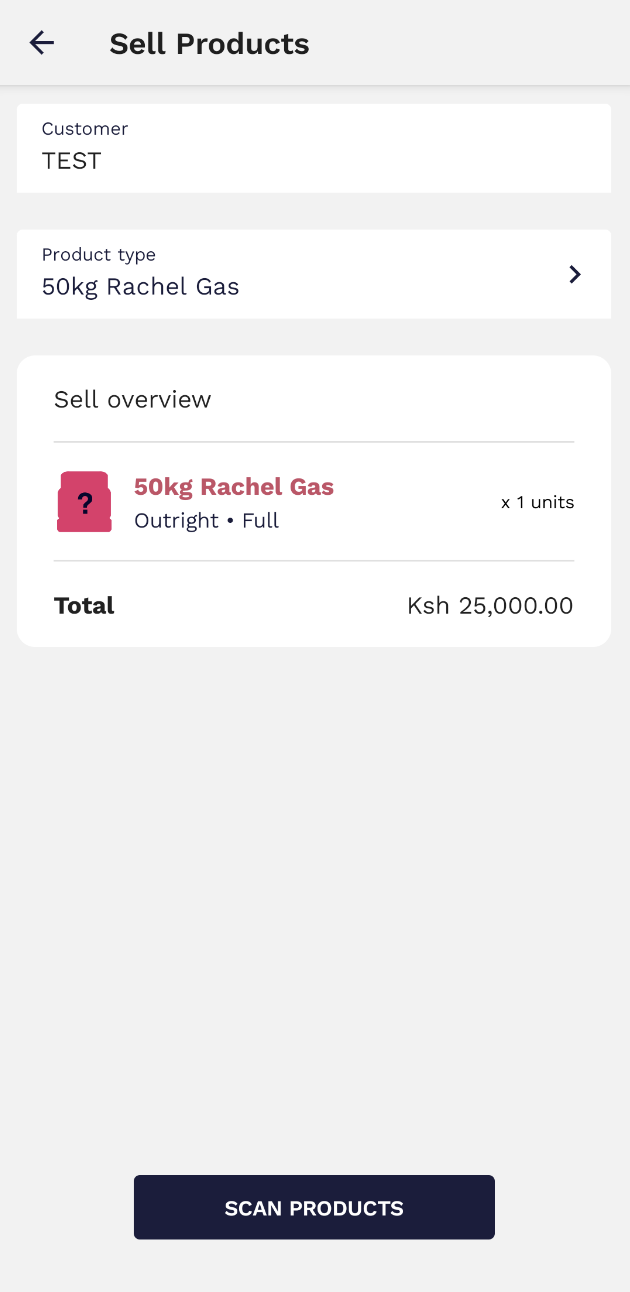
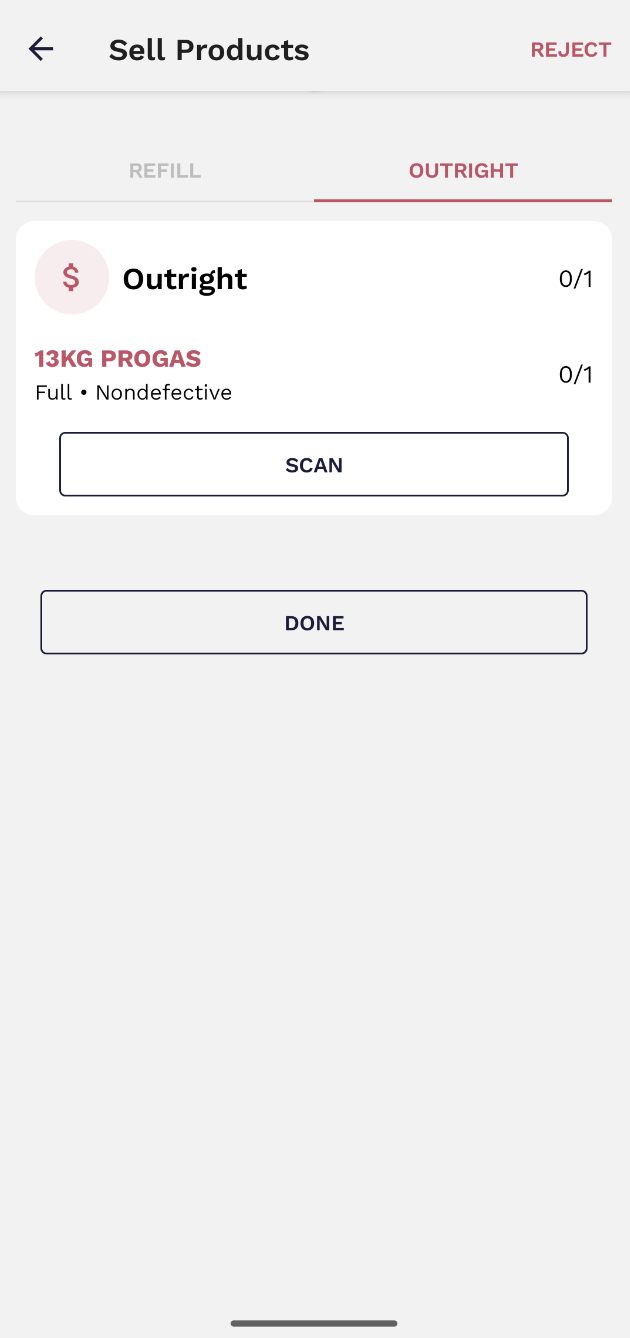
To make an outright sale, you should insert the customer name (or add a new one if necessary) and select the product type. Then choose the correct type of sale (refill/outright or accessory) and insert the correct quantity.
Then, a window will appear where you are requested to confirm the sale.

In order to complete the sale, you must scan the cylinder/s being sold.
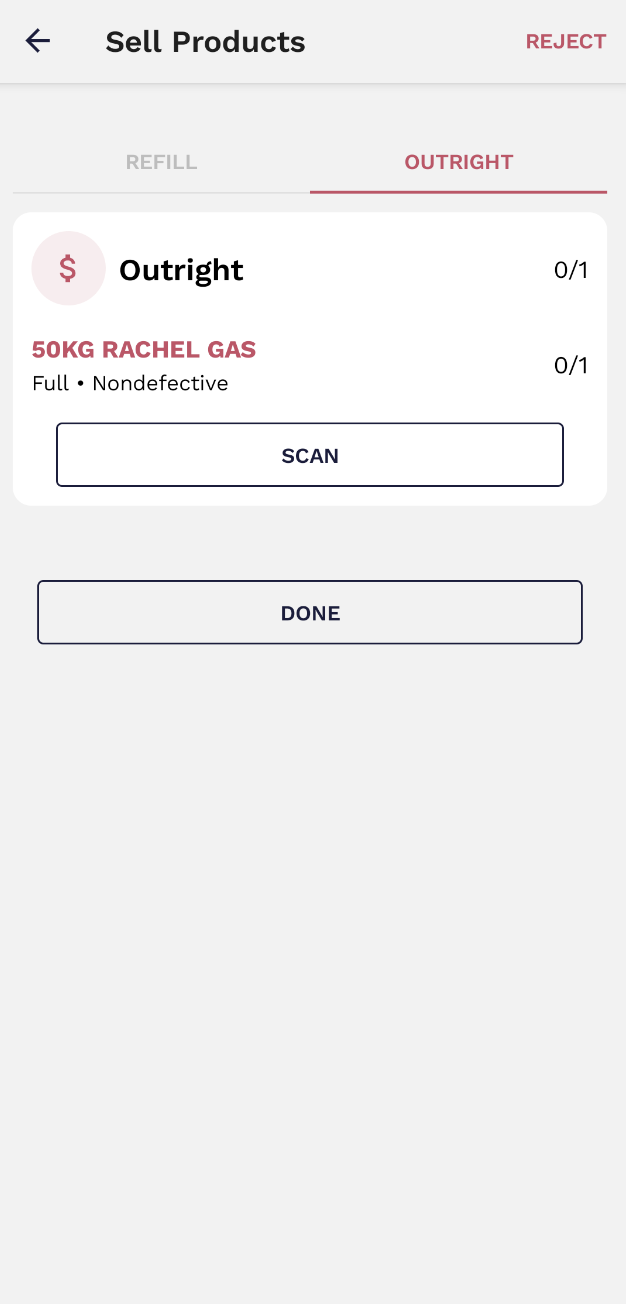
If the barcode cannot be scanned, you can insert the serial number by manually typing it in (from the keyboard section).
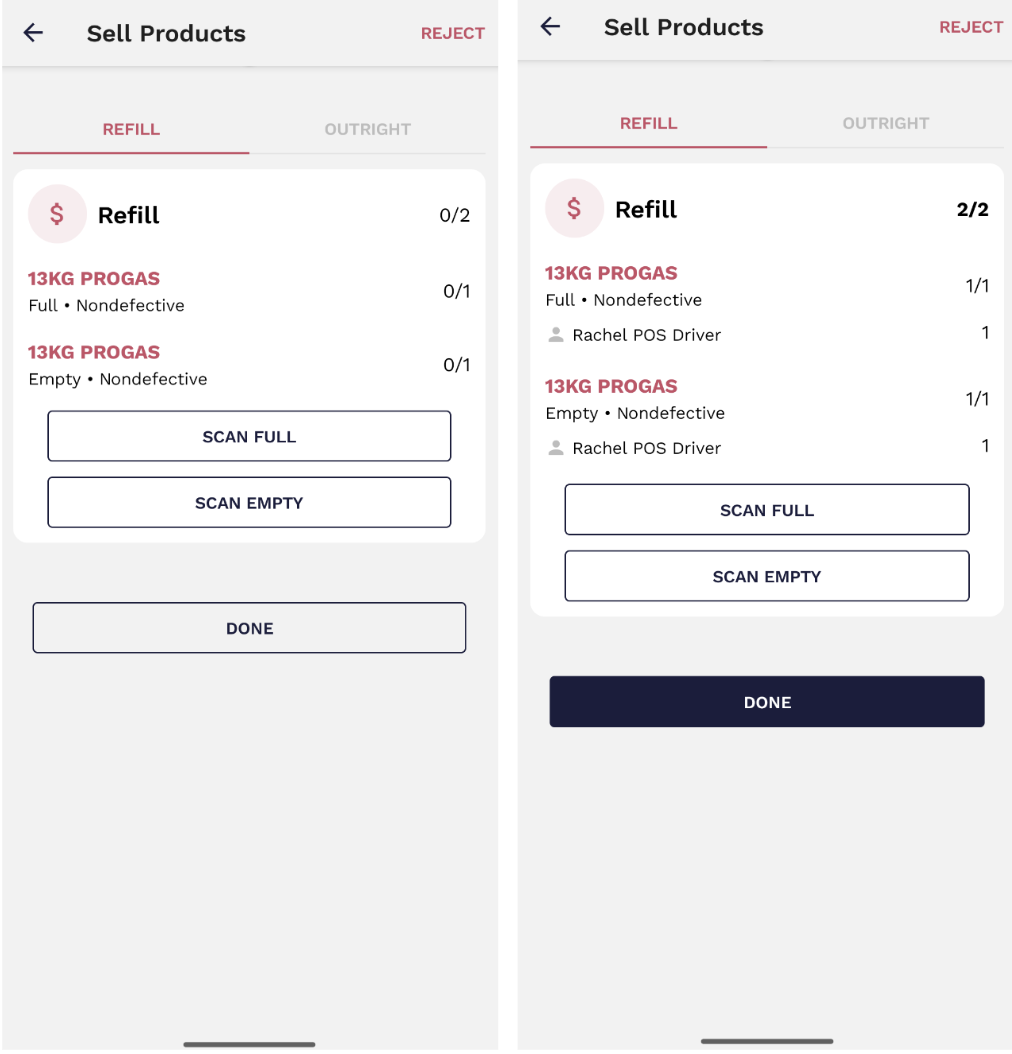
If the sale is a refill, then you must scan both the full cylinder (in your vehicle) and the empty cylinder (that is going to be refilled).
4. How to Sell Products (+Scanning)
Sell Products
Once the products have been loaded and the load is confirmed and signed, you can begin. Click on Start Trip to initiate the trip and start to sell the products.
The offload option is always available because it is not mandatory to sell every product from the stock in order to offload.
To make an outright sale, you should insert the customer name (or add a new one if necessary) and select the product type. Then choose the correct type of sale (refill/outright or accessory) and insert the correct quantity.
Then, a window will appear where you are requested to confirm the sale.

In order to complete the sale, you must scan the cylinder/s being sold.

If the barcode cannot be scanned, you can insert the serial number by manually typing it in (from the keyboard section).
If the sale is a refill, then you must scan both the full cylinder (in your vehicle) and the empty cylinder (that is going to be refilled).
The payment might be done by three different methods: Invoice, Bank transfer, or MPESA code. All of them need a confirmation code to prove that the payment was made. All you need to do is select the payment method, introduce the payment code and confirm it. The request should be processed in a short period of time and if everything is correct, the payment will be successfully processed.
Video tutorial
Create a customer
If your customers are not yet added to the customer list, you can manually add them. To do that, all you have to do is select Add new from the customer list and insert their information. They will be automatically added once you submit the form.
Video tutorials
Order details
You can always access order details and view the receipts for the products you sold. Besides that, it is possible to add more payment codes, in case it’s needed, or reject the payment if there’s any reason for that.
You can reject payment codes but remember that this action is irreversible so it should only be done in case there’s a valid reason for that.
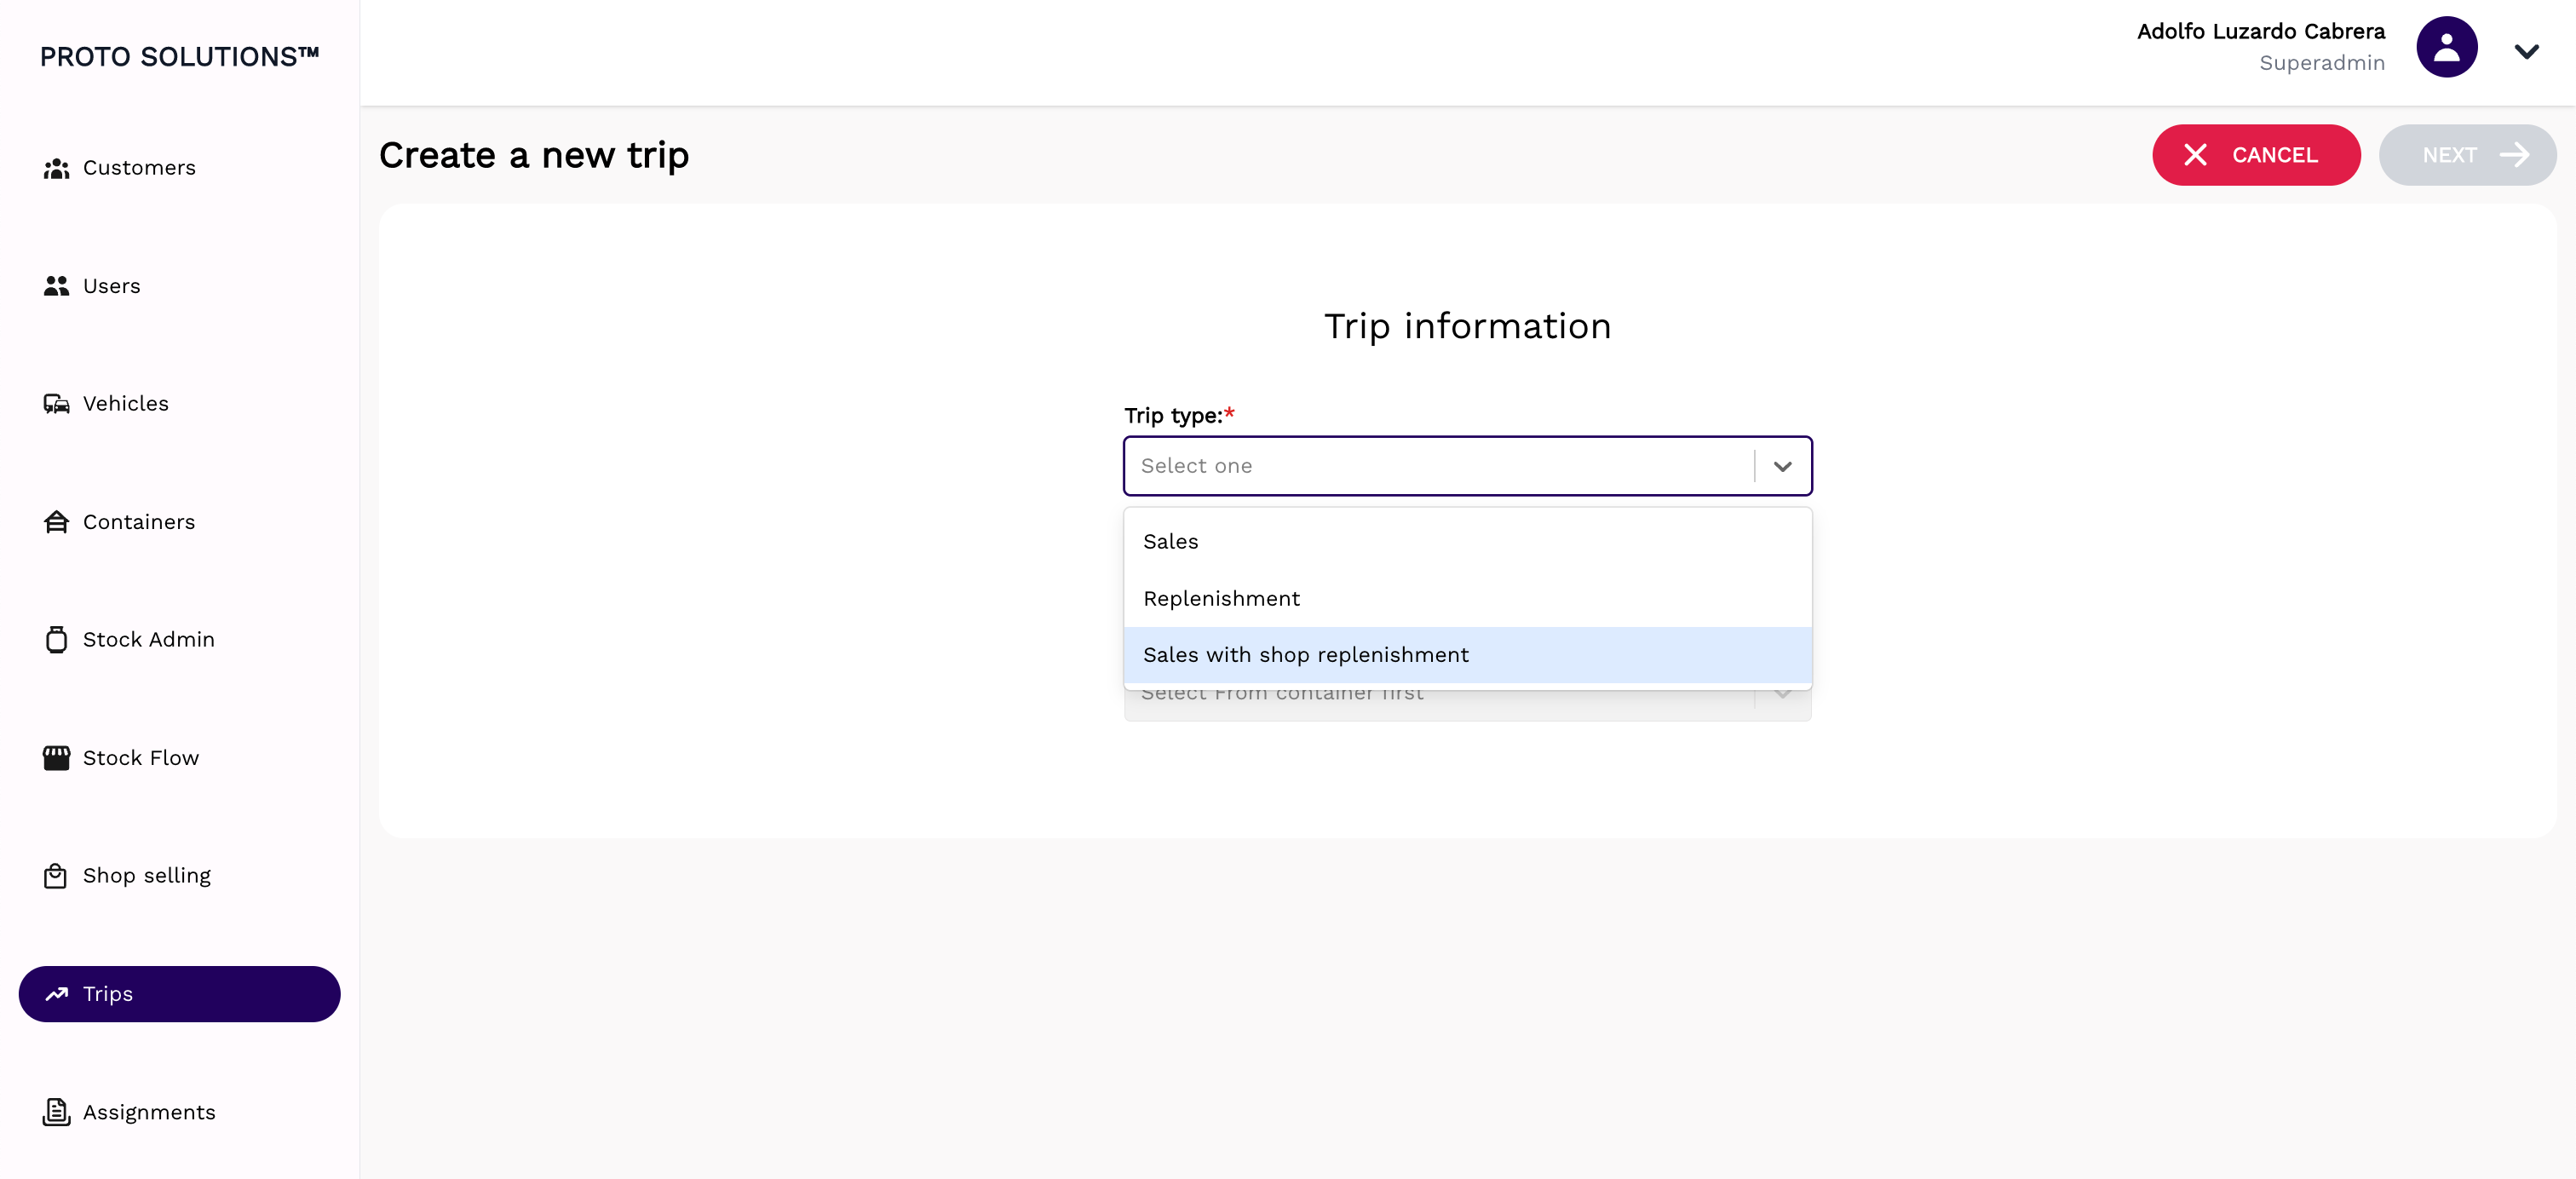
5. Sales with shop replenishment trips
Backoffice - New trip type Sales with Shop replenishment:
We now have a new trip type called Sales with shop replenishment, which is a sales trip that also allows drivers to replenish shops. The shops that can be replenished MUST BE in the same sales area as the originating container.
Replenishment to shops will consist of FULL cylinders/accesories.
Replenishment from shops will consist of EMPTY or SUSPECTIVE DEFECTIVE cylinders/accessories.
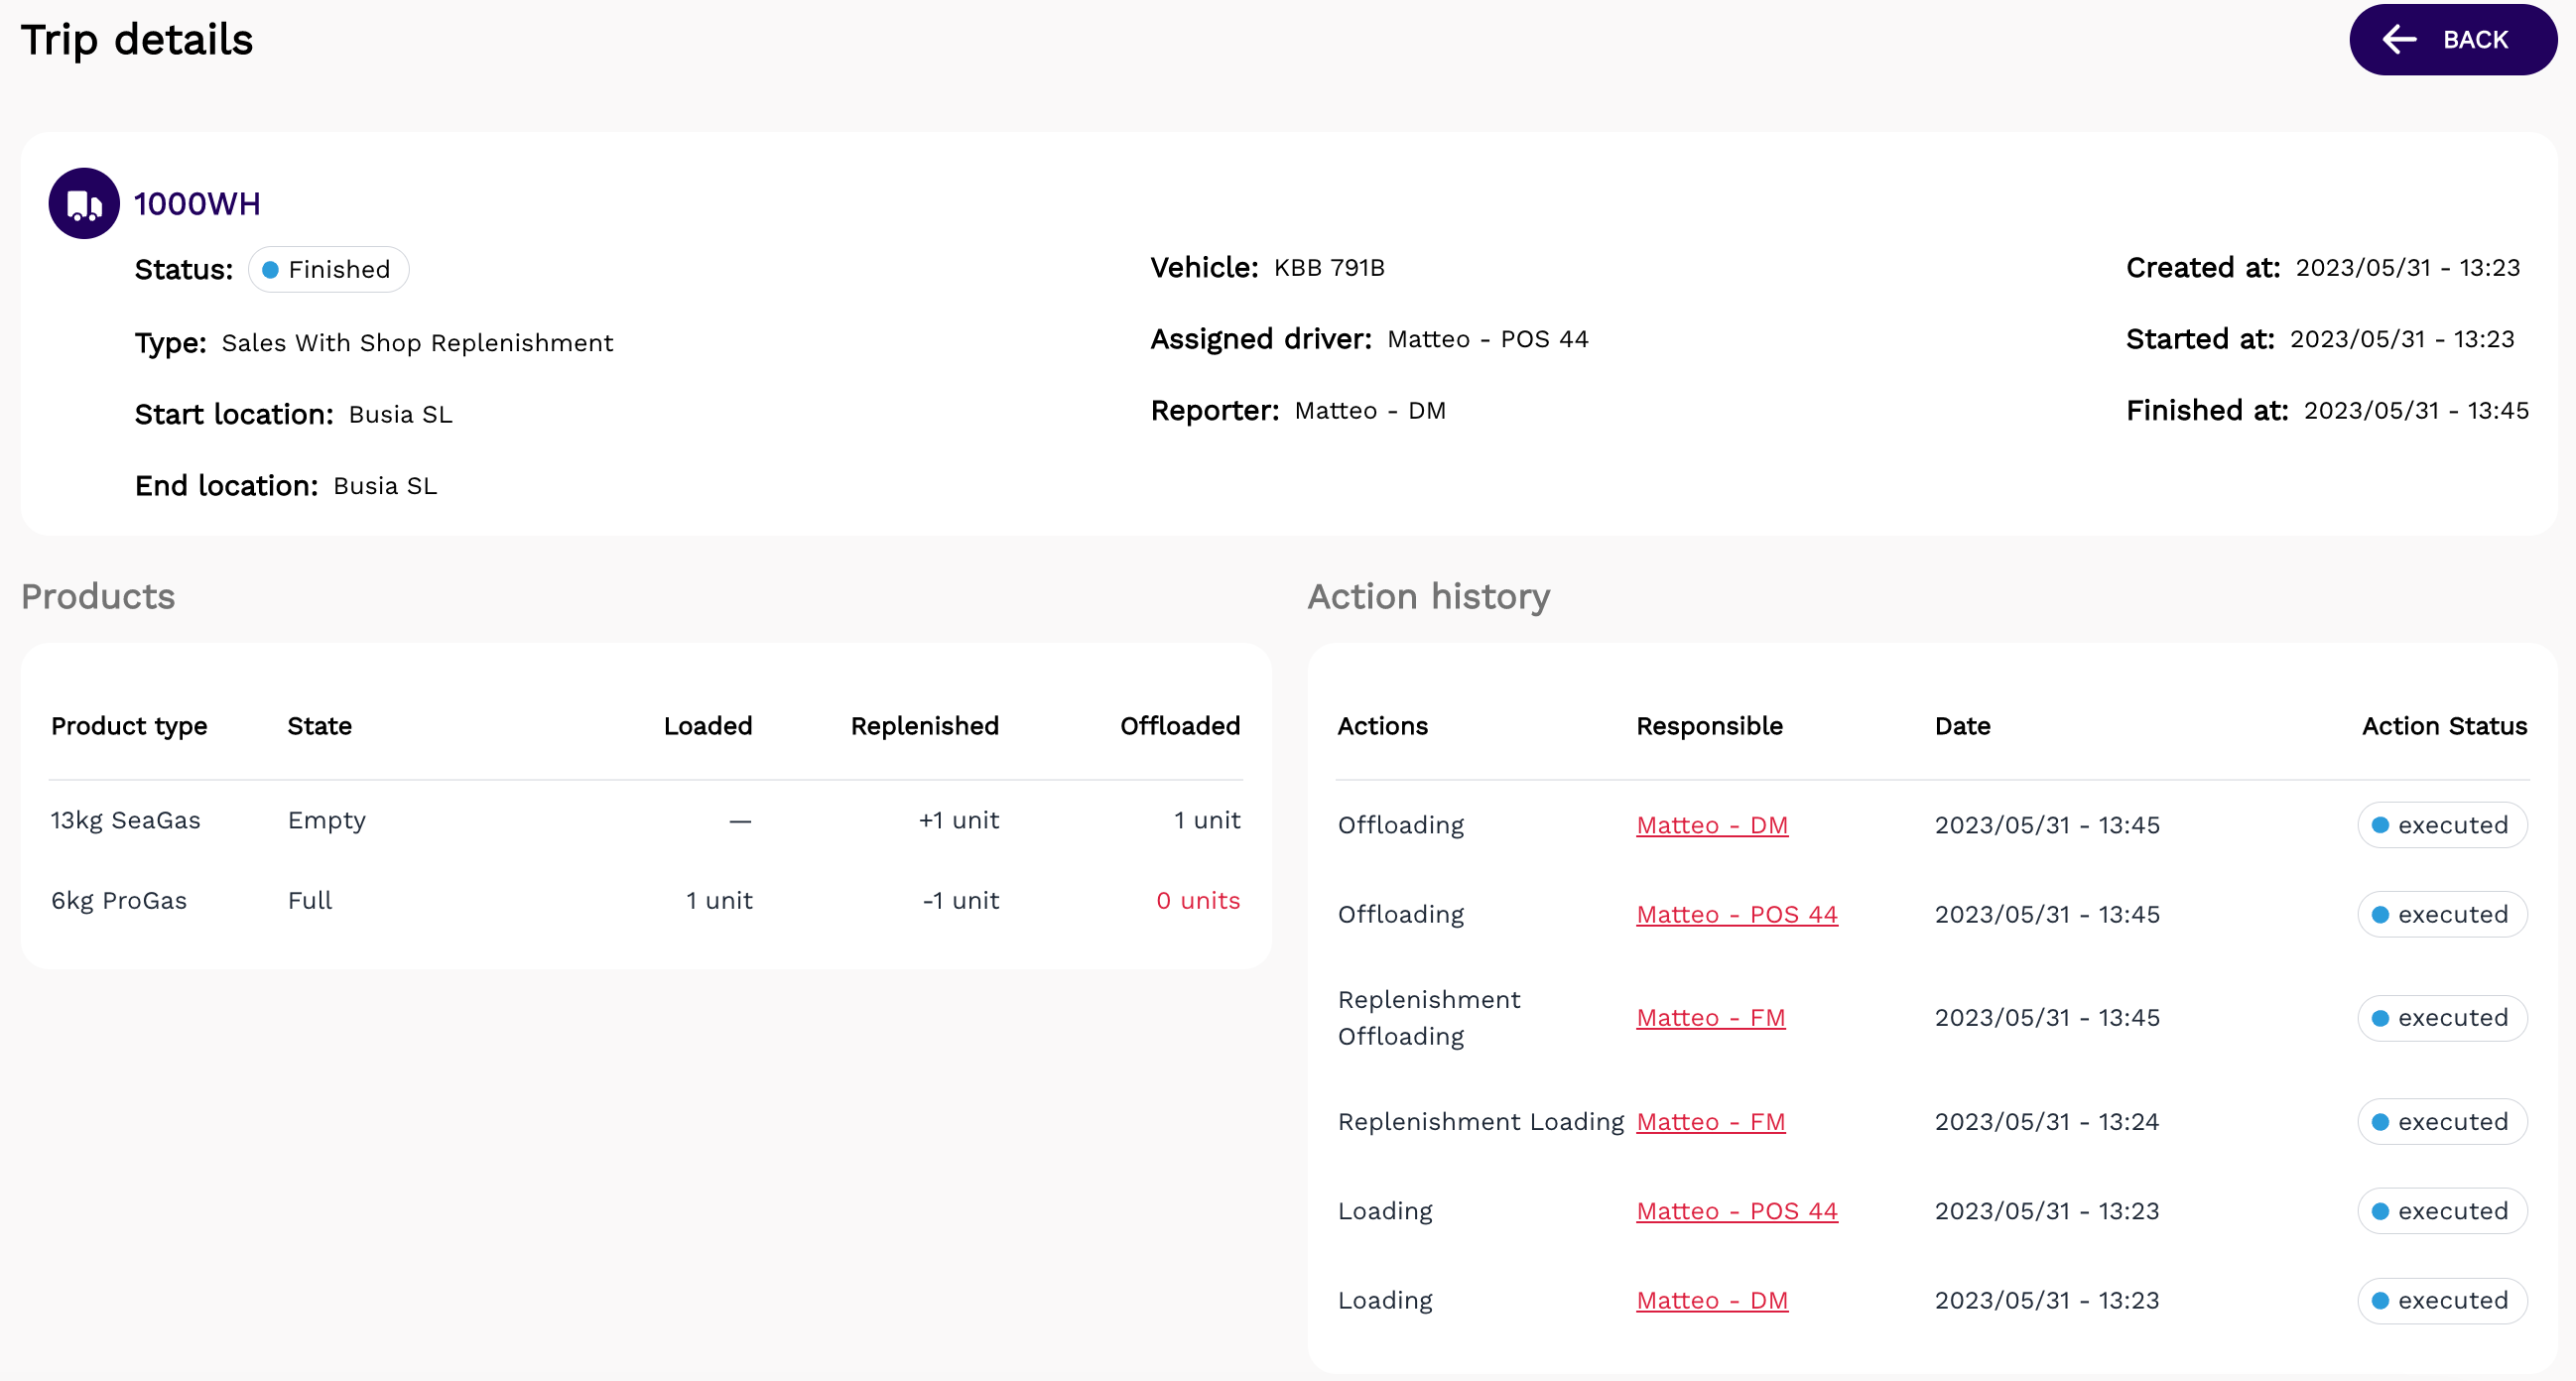
The details about the replenished products will be shown within the trip details page, as well as the action details of each load/offload to a shop.
App - flow for sales with shop replenishment trips
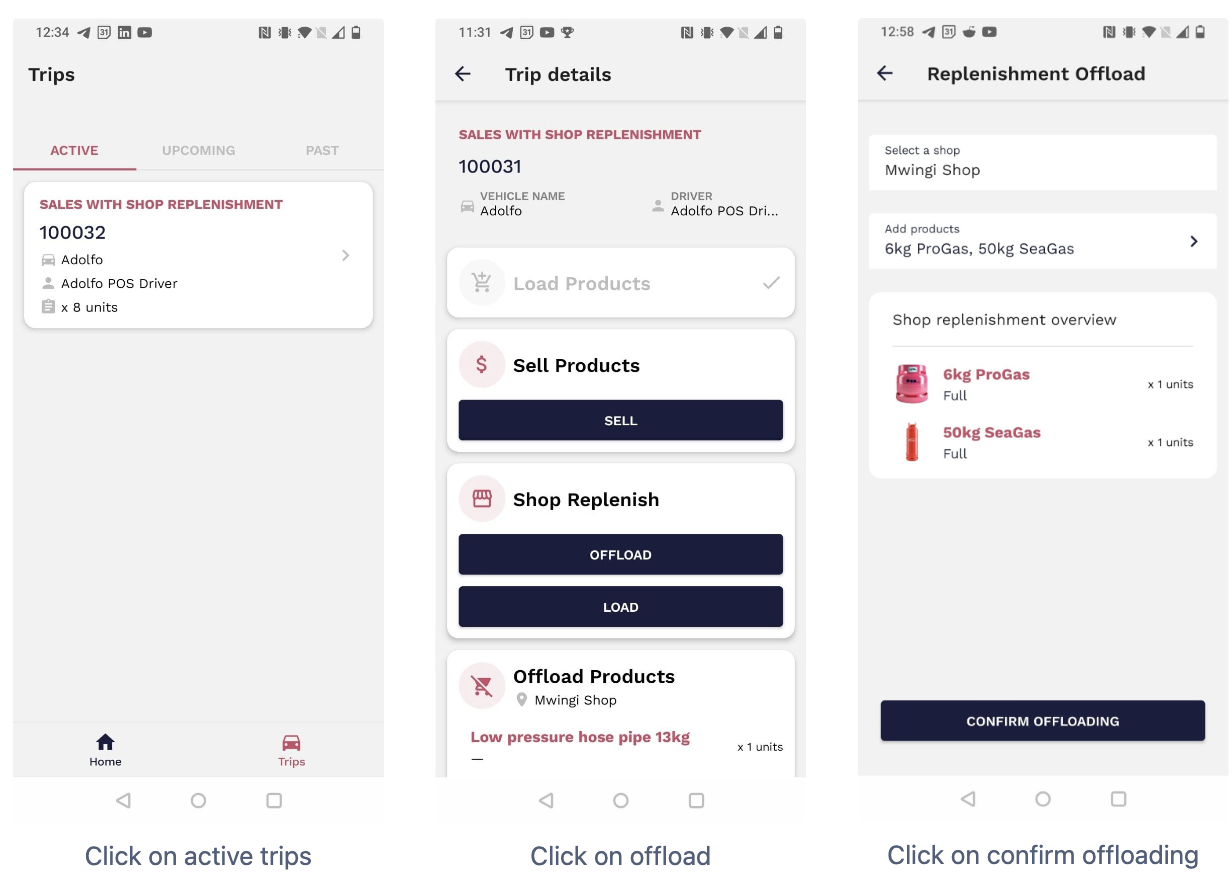
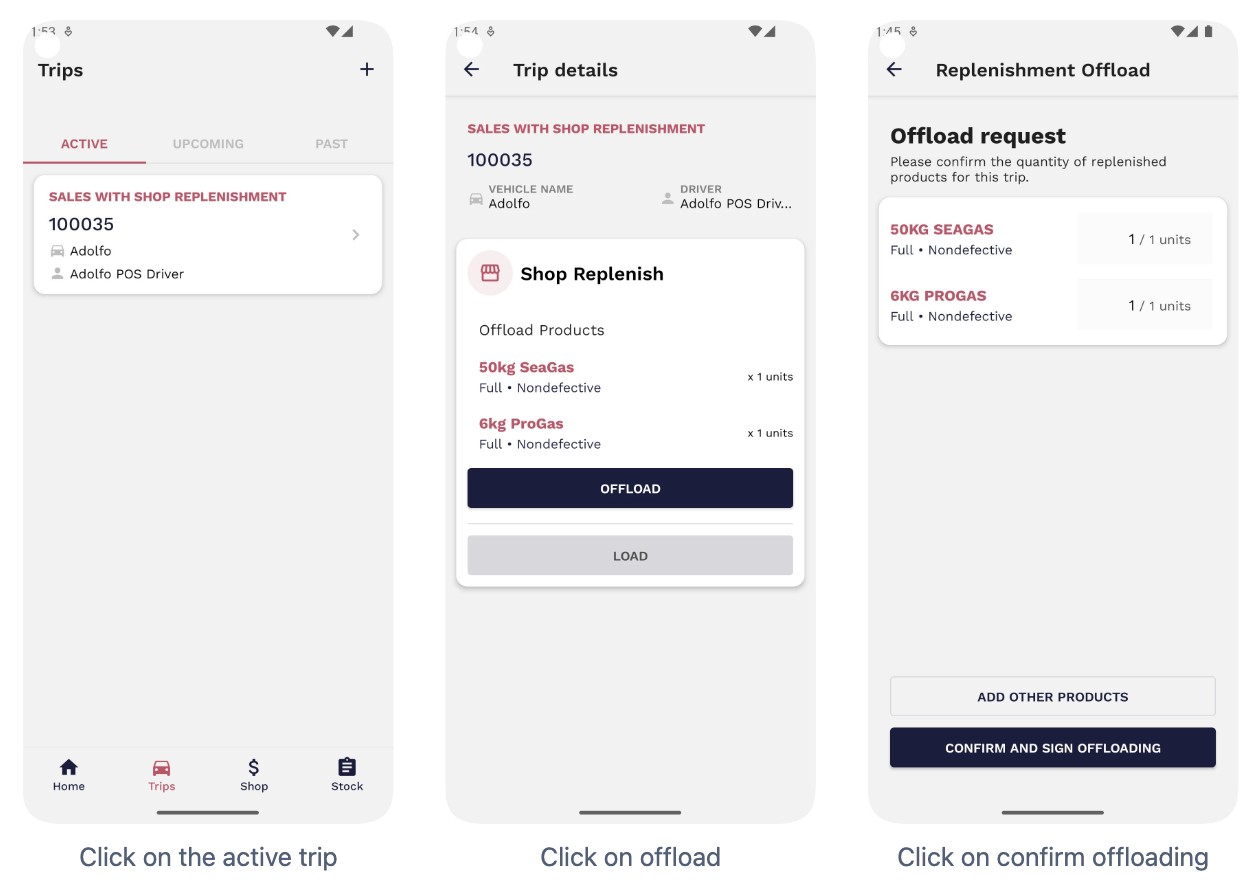
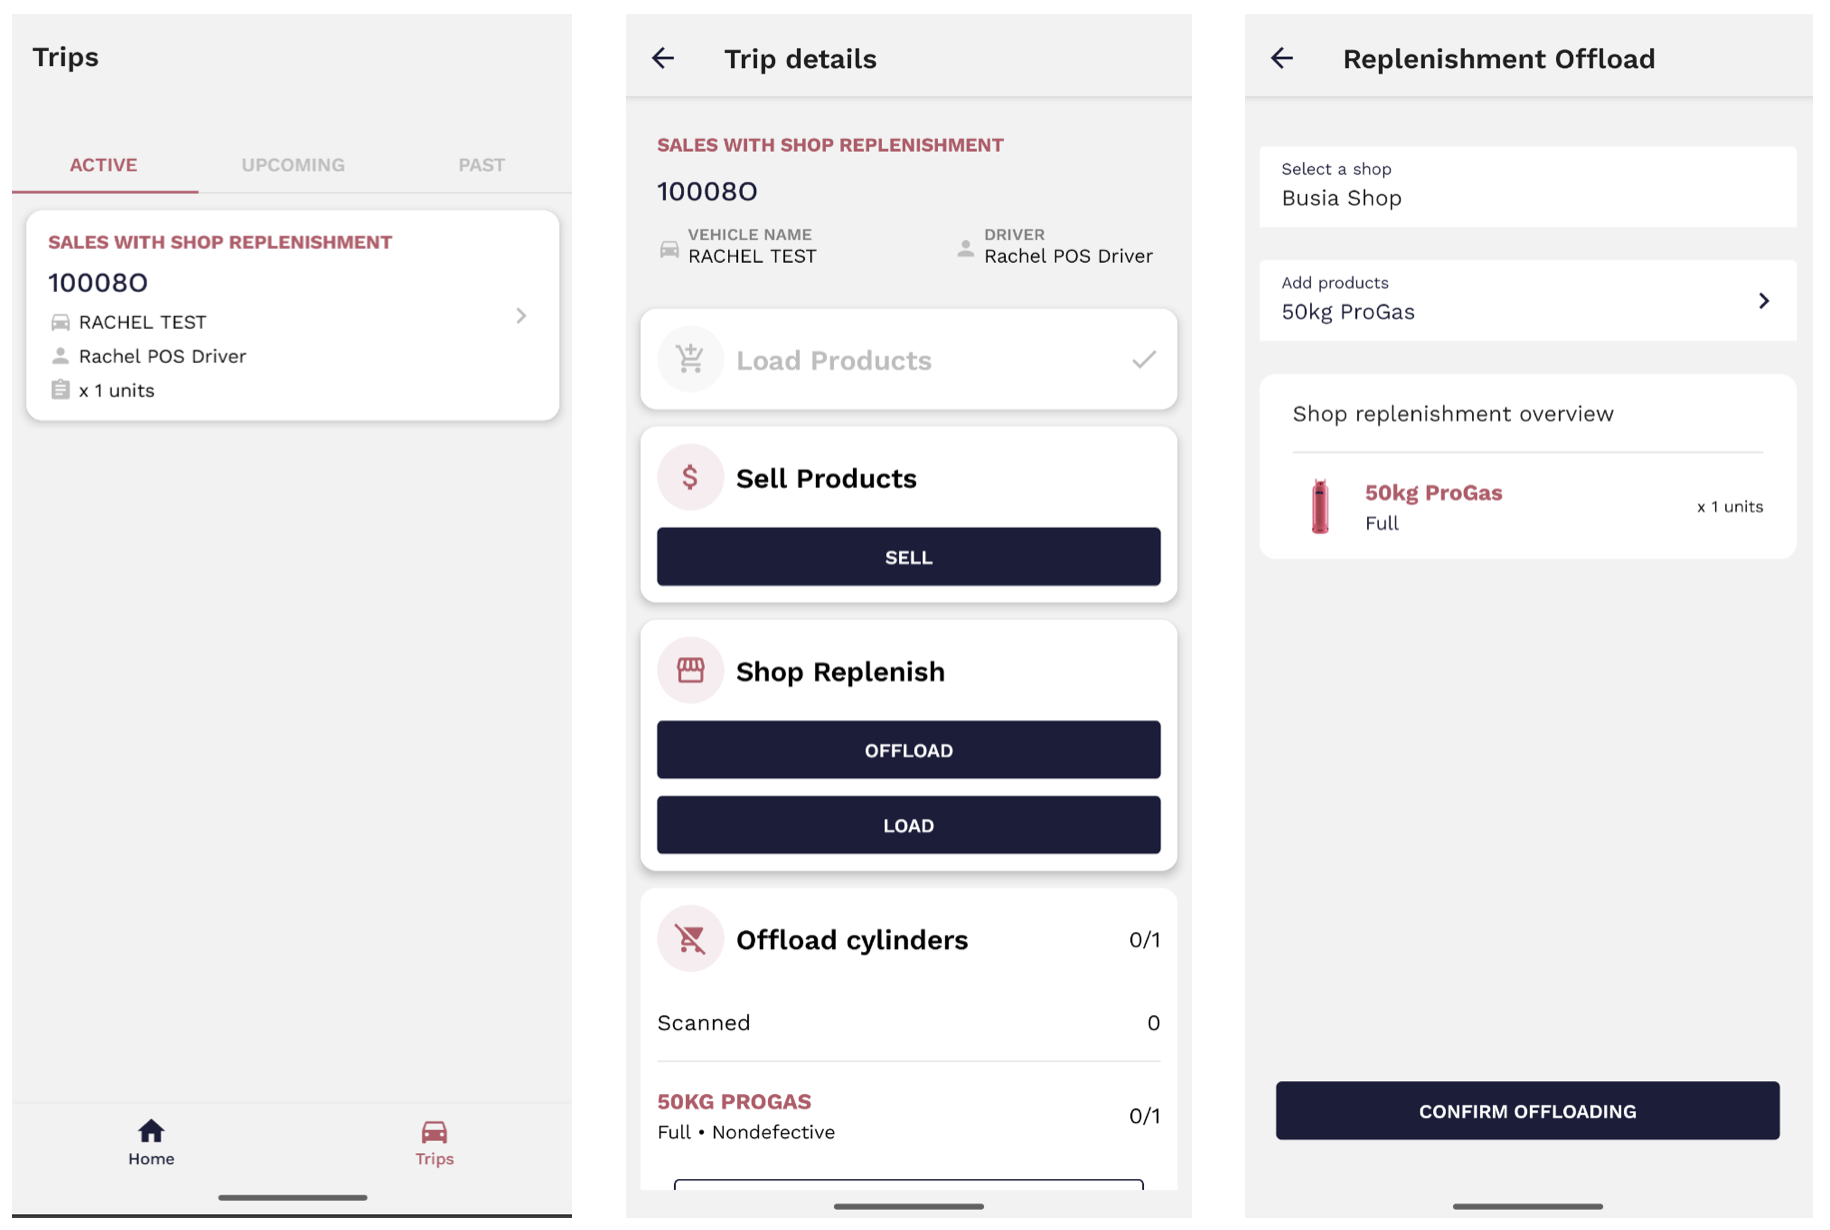
We are now supporting a new trip type called sales with shop replenishment trip. This trip type allows a sales driver to replenish a shop within a sales trip. The sales driver will be able to load/start the trip similarly to a normal sales trip. Additionally, the sales driver will be shown an option to offload full products at any shop within their sales area, as well as load empties and defectives from a shop within their sales area into the vehicle.
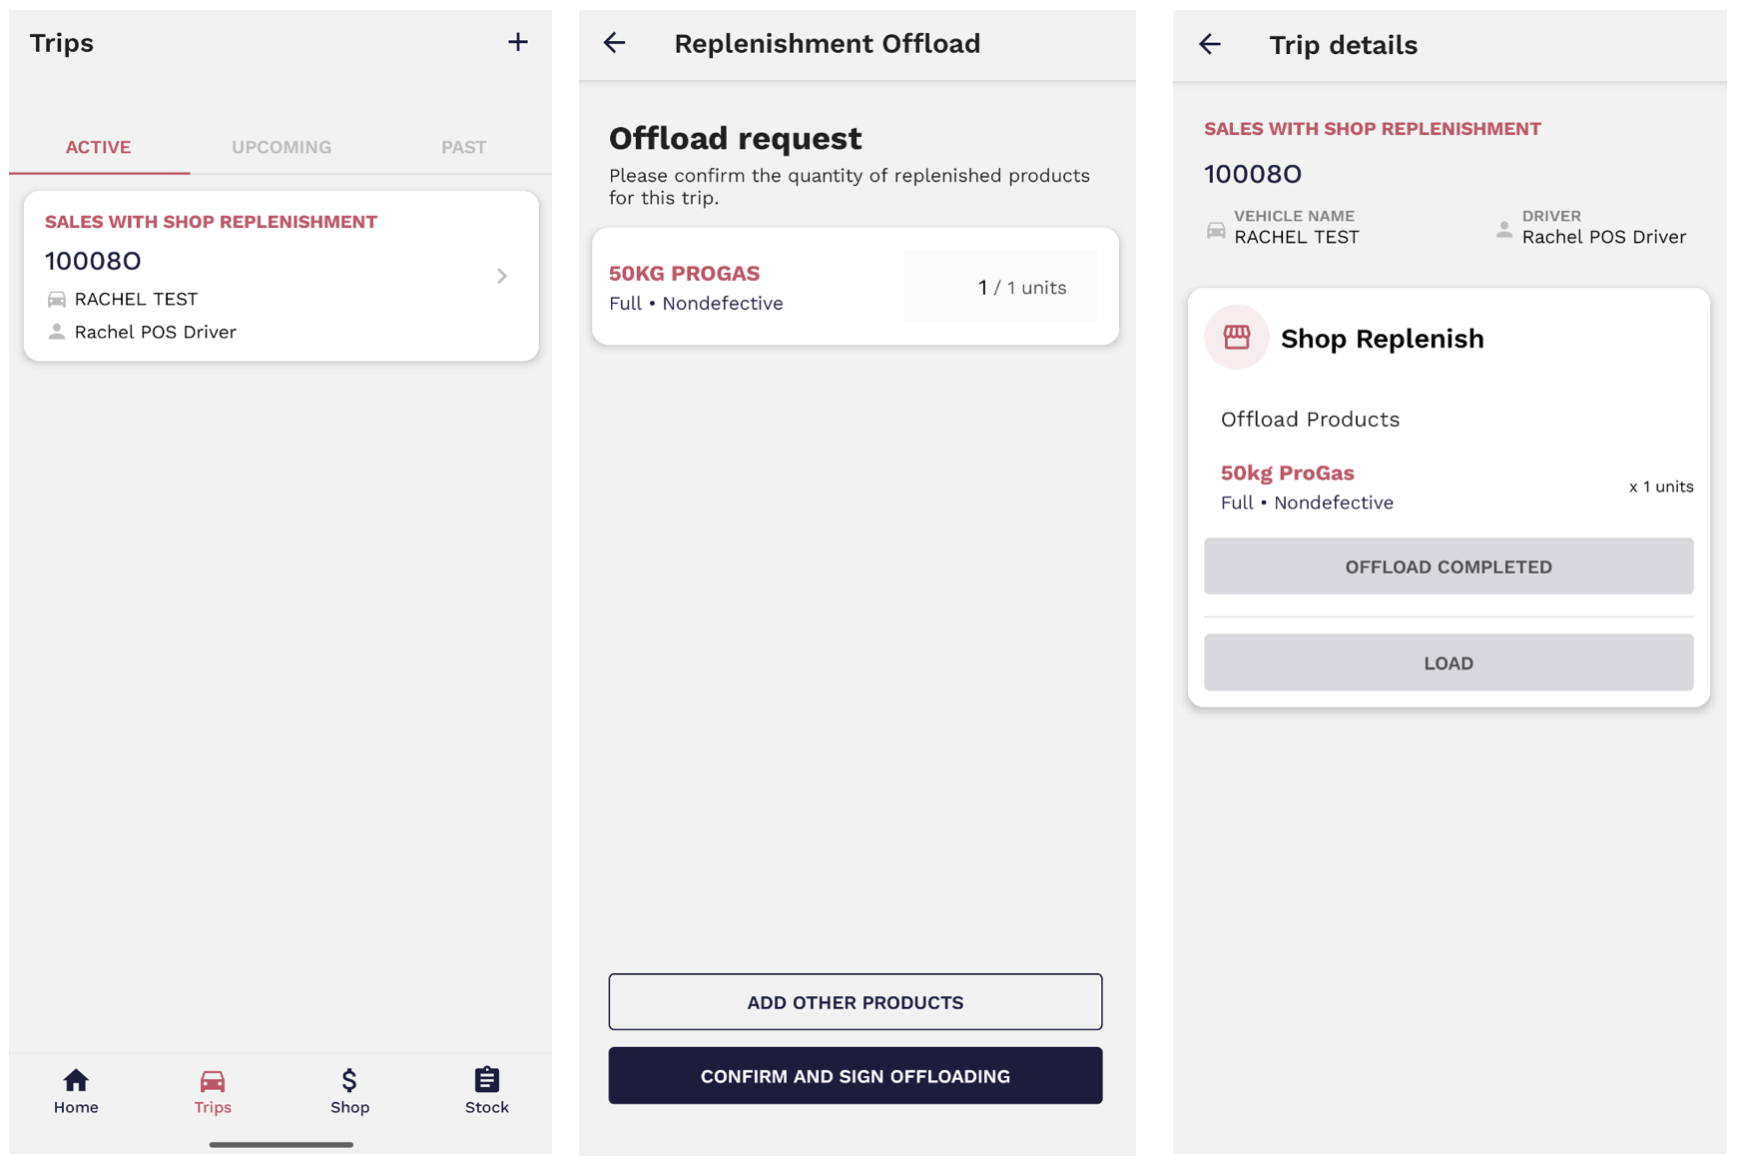
The replenishment is initiated by the driver by clicking on the offload button inside the Shop replenish section. The driver will determine how many FULL cylinders he wants to offload to the shop as shown in the screenshot:
After the driver confirms the offloading, the shop manager then needs to sign the movement within their app, as shown in the screenshot:
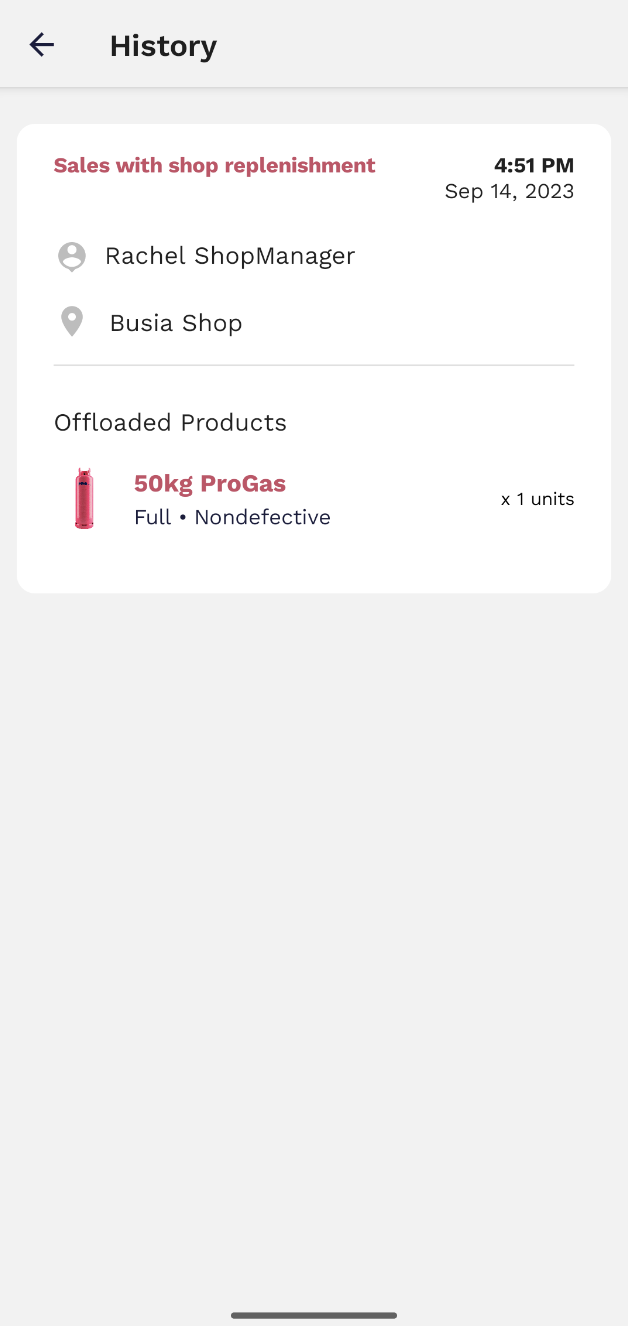
After both driver and shop manager have signed the movement, the products will be added to the stock count of the shop and the trip summary will indicate the replenished amounts. The replenished products will show in the driver’s trip summary. As well as in the selling history available to the driver within the app.
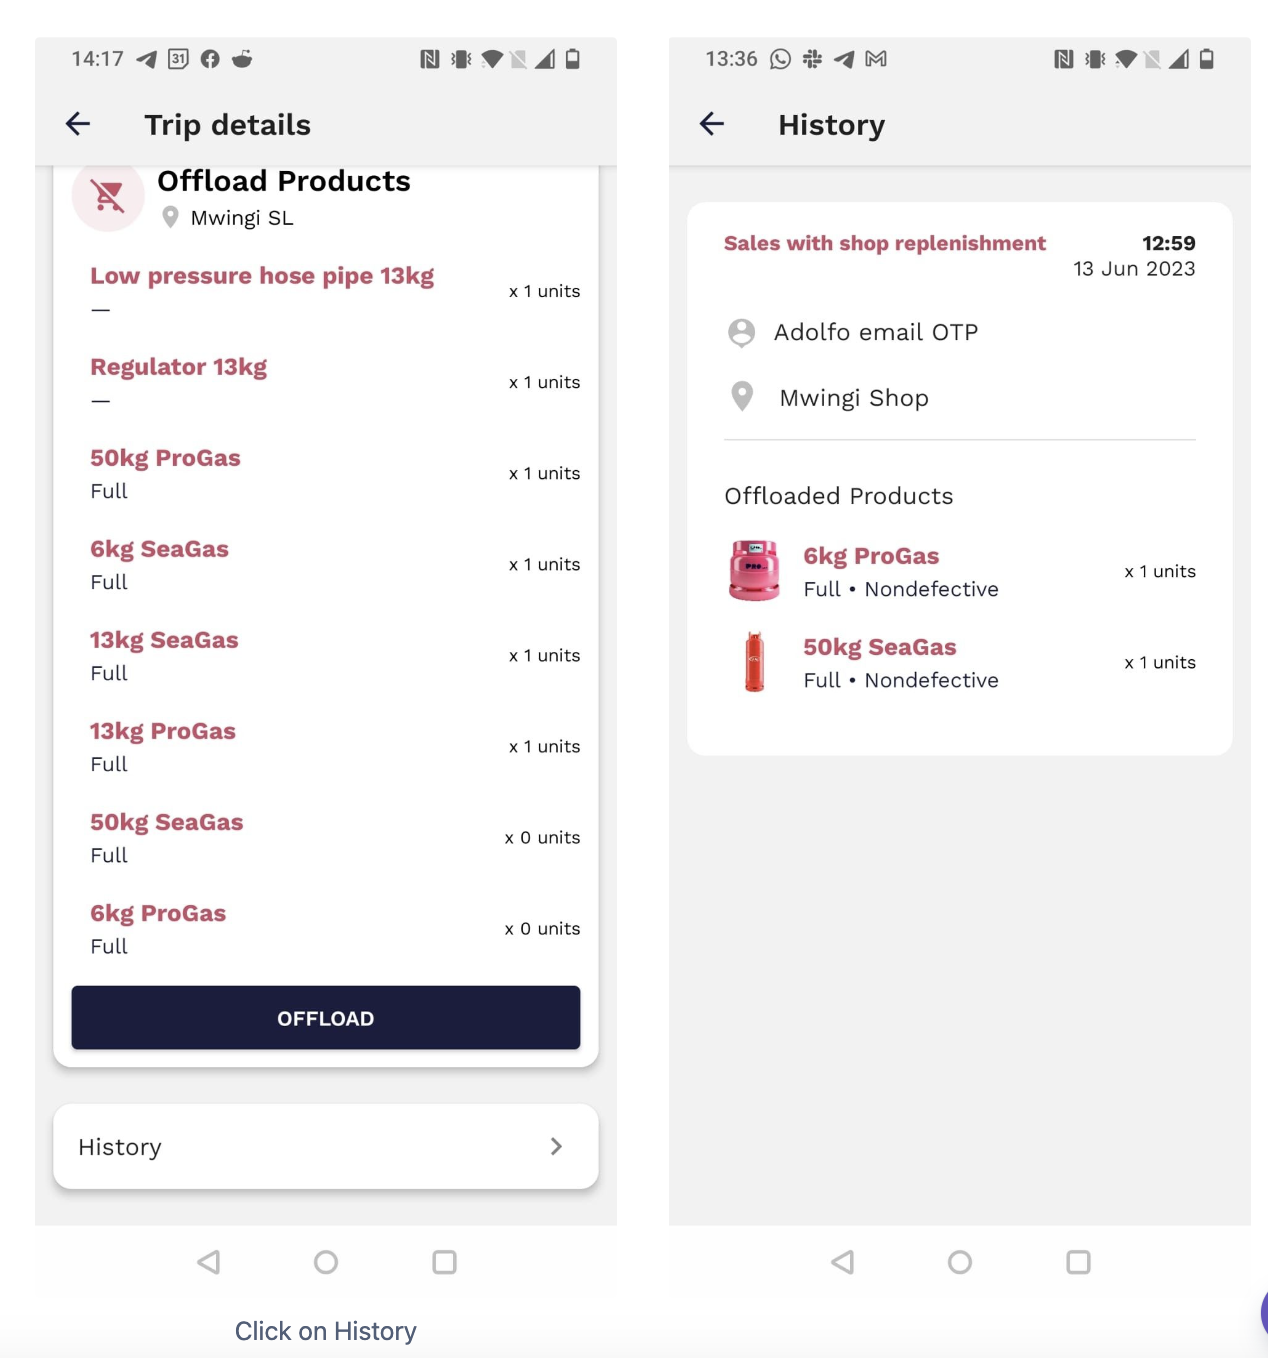
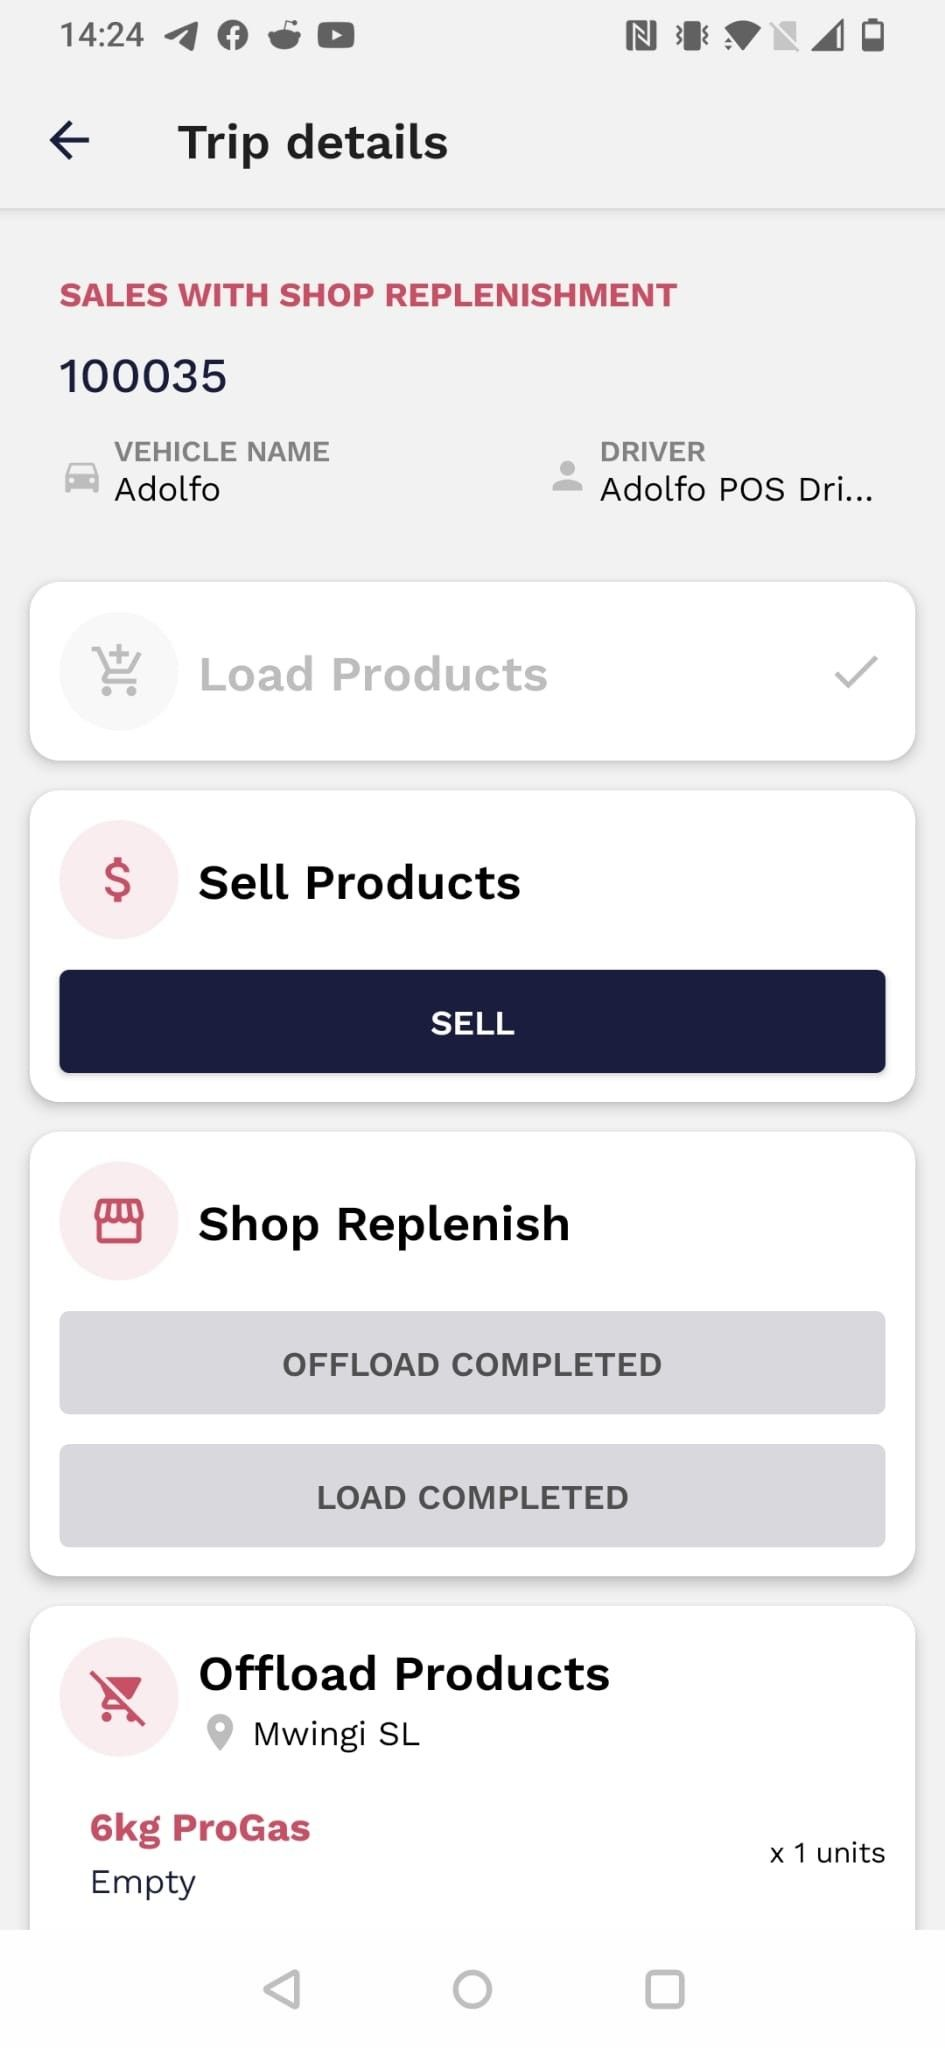
There will only be 1 shop replenishment offload and 1 shop replenishment load allowed per trip. When both replenishments are done the driver should see the buttons disabled with the labels OFFLOAD COMPLETED and LOAD COMPLETED.
5. Sales with shop replenishment trips (+Scanning)
Backoffice - New trip type Sales with Shop replenishment:
We now have a new trip type called Sales with shop replenishment, which is a sales trip that also allows drivers to replenish shops. The shops that can be replenished MUST BE in the same sales area as the originating container.
Replenishment to shops will consist of FULL cylinders/accesories.
Replenishment from shops will consist of EMPTY or SUSPECTIVE DEFECTIVE cylinders/accessories.
The details about the replenished products will be shown within the trip details page, as well as the action details of each load/offload to a shop.
App - flow for sales with shop replenishment trips
We are now supporting a new trip type called sales with shop replenishment trip. This trip type allows a sales driver to replenish a shop within a sales trip. The sales driver will be able to load/start the trip similarly to a normal sales trip. Additionally, the sales driver will be shown an option to offload full products at any shop within their sales area, as well as load empties and defectives from a shop within their sales area into the vehicle.
The replenishment is initiated by the driver by clicking on the offload button inside the Shop replenish section. The driver will determine how many FULL cylinders he wants to offload to the shop as shown in the screenshot:
After the driver confirms the offloading, the shop manager then needs to sign the movement within their app, as shown in the screenshot:
After both the driver and shop manager have signed the movement, the products will be added to the stock count of the shop and the trip summary will indicate the replenished amounts. The replenished products will show in the driver’s trip summary. As well as in the selling history available to the driver within the app.
There will only be 1 shop replenishment offload and 1 shop replenishment load allowed per trip. When both replenishments are done the driver should see the buttons disabled with the labels OFFLOAD COMPLETED and LOAD COMPLETED.
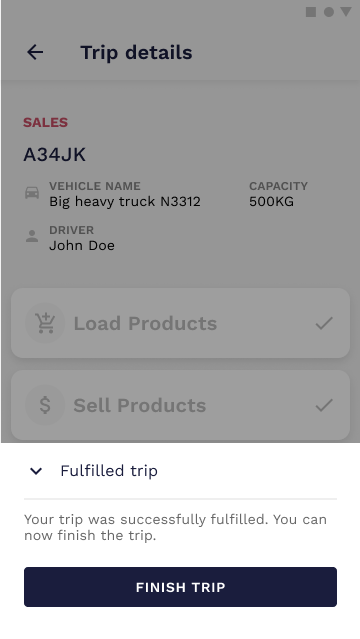
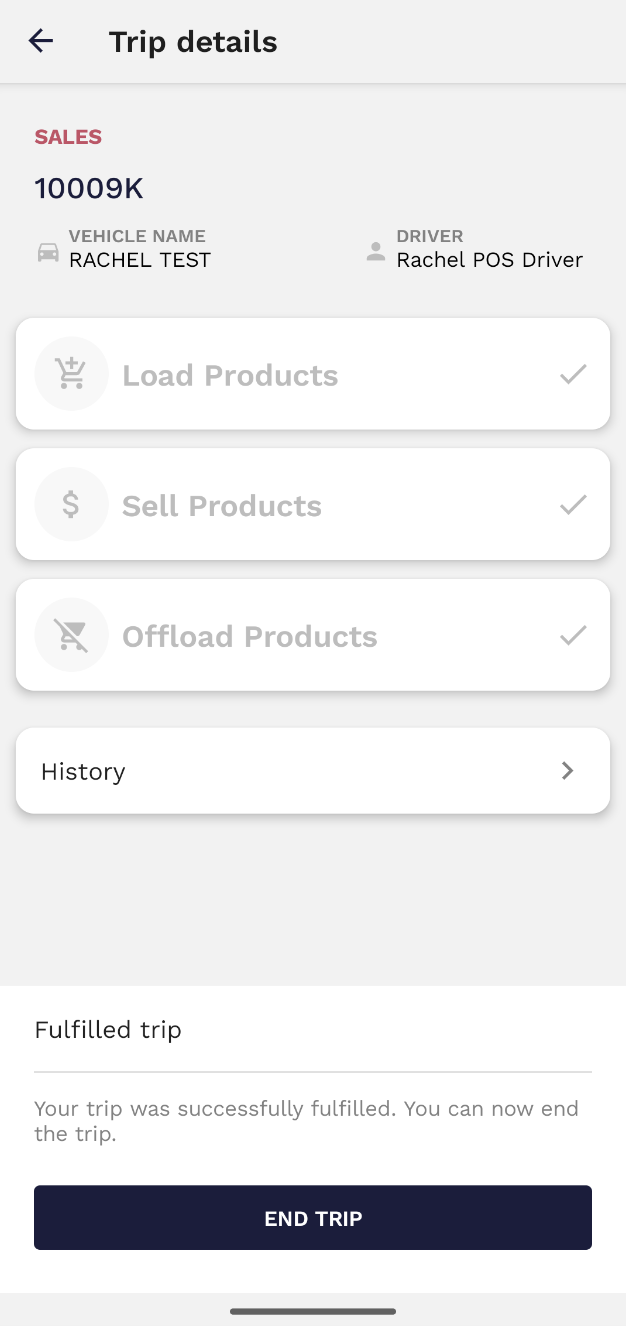
6. How to Finish Trips
Finish a trip
Once your shift is finished, you have to finish the current trip. You don’t have to sell all of the loaded products to finish a trip but you will need to Offload them first.
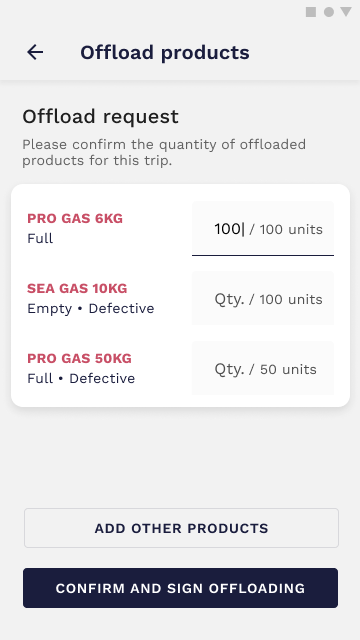
All you need to do is go to the final location and offload your products. The process is the same as for the loading. Both driver and container manager have to confirm the quantity and sign the action.
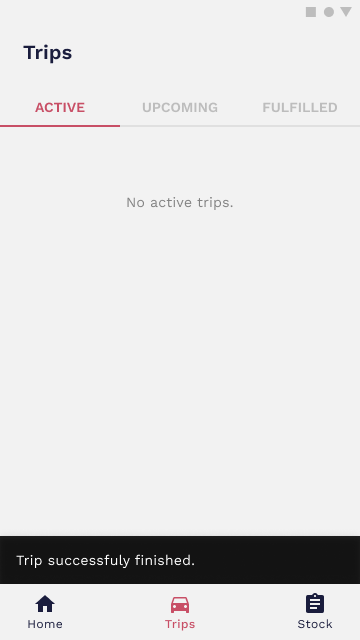
After that, a pop-up will be displayed and you can finish the trip.
Video tutorials
6. How to Finish Trips (+Scanning)
Finish a trip
Once your shift is finished, you have to end the current trip. You do not have to sell all of the loaded products to finish a trip but you will need to Offload them first.
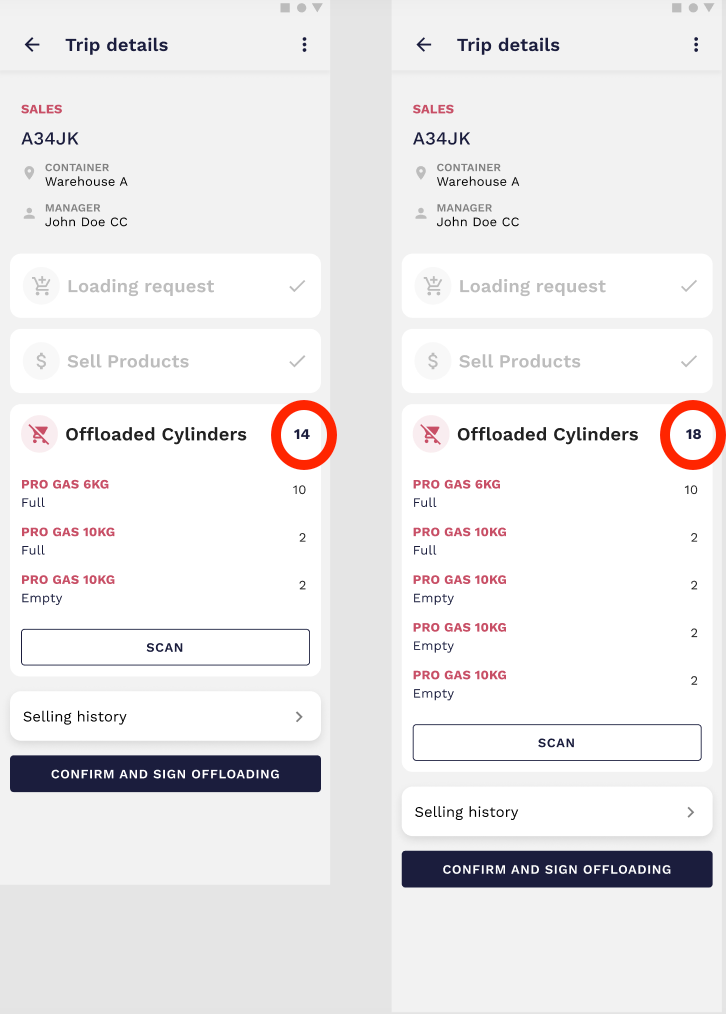
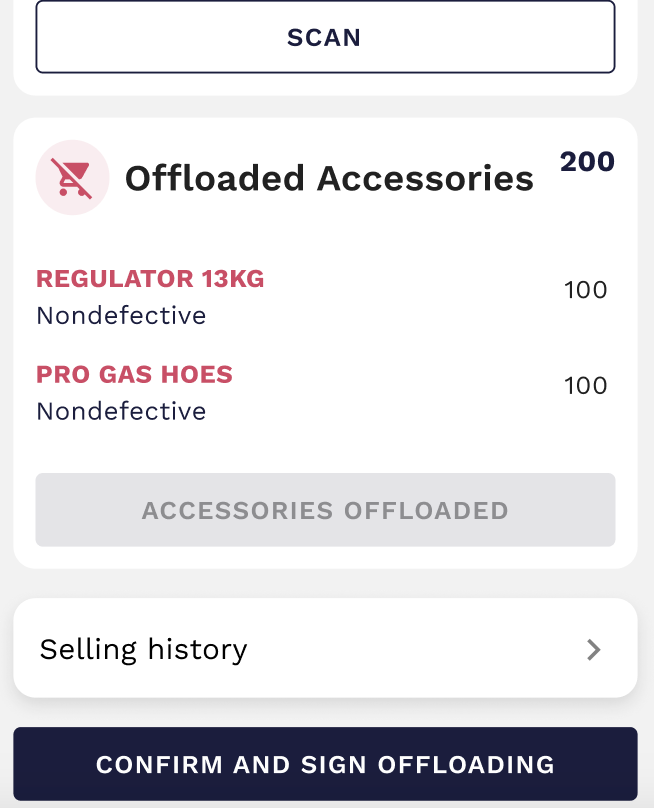
All you need to do is go to the final location and offload your products. In this case, you will need to scan all the cylinders and insert the amount of accessories that are being offloaded. Both the driver and the container coordinator have to confirm the quantity and sign the action but it is only the driver who must scan the cylinders (a scanner has the capability to participate in this procedure, concurrently scanning cylinders alongside the driver).
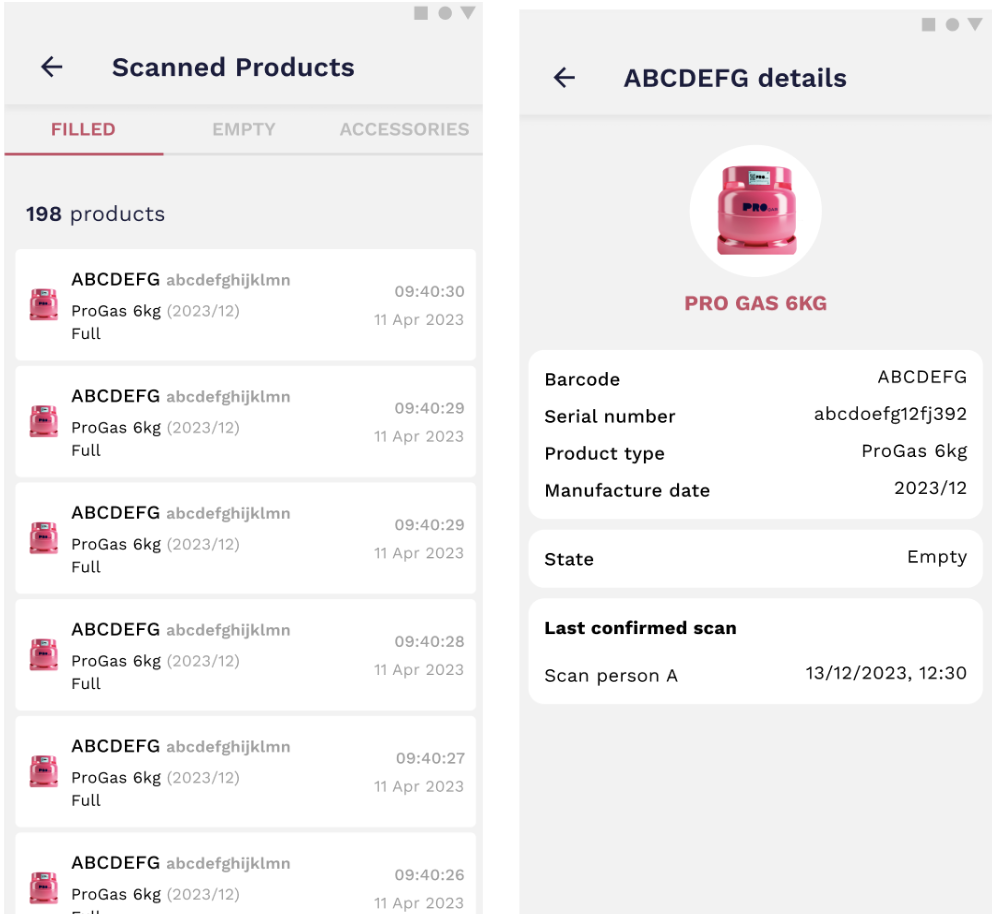
In order to offload, you must scan the products which are in the vehicle. To do so, click on 'scan' and scan the barcodes of the cylinders. If the barcode is unscannable, you can input the serial number by going to the keyboard section.
To view all cylinders in the order, you can click ‘view all' located on the top right. You can then click on each cylinder in the list to view detailed information about the particular cylinder.
You may offload more cylinders than expected. If the total number of cylinders expected to be offloaded is 14 and the driver has 18 cylinders in the vehicle, you should simply scan all of the cylinders physically available, then the total number of cylinders will be updated.
Upon scanning the cylinders and inputting the quantities of accessories, once the products are prepared for offloading, you can proceed to confirm and sign off on the loading.
Then, a confirmation window will pop up where you must once again confirm that you will be offloading the vehicle's contents. 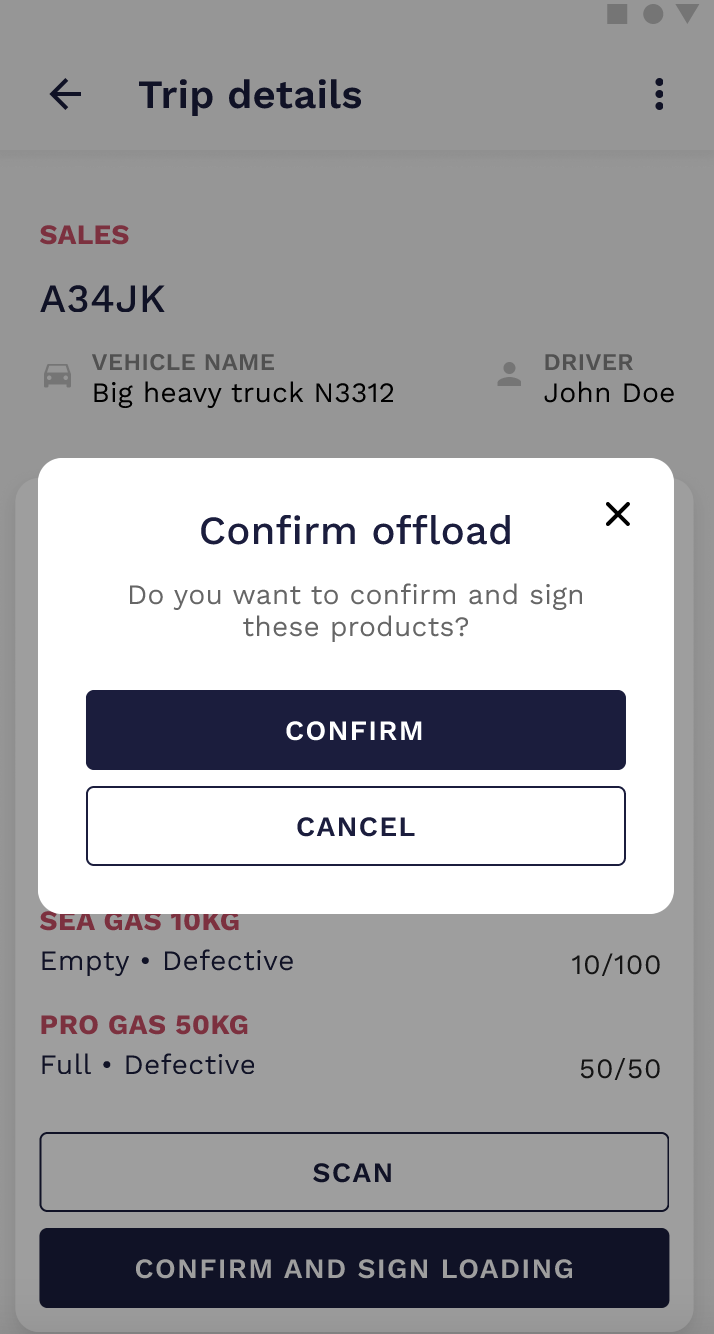
When this is confirmed, you must wait for the container coordinator at the end location to confirm and sign the offloading.
After that, a pop-up will be displayed and you can end the trip.
Video tutorials
7. How to Log out/Clock out
Clock out & Log out
Similar to Clock in, after finishing your shift, you should click on the Clock Out button and Log out. If you Log out without clocking out, it will automatically register your shift as finished.